Being a PHP programmer, I naturally experimented in MySQL. After developing a collection of successful Websites based on the powerful combination of PHP-MySQL, I had the opportunity to develop a data-driven Website using IBM’s DB2 UDB (universal database).
In the world of industry database management, there are three major players: IBM DB2, Microsoft SQL Server and Oracle. There is a lot of literature about using both Microsoft and Oracle’s products, but information on using DB2 specifically with PHP was difficult to find. I developed this tutorial to help the age PHP-MySQL application developer expand his or database horizons to include IBM’s powerful database offering.
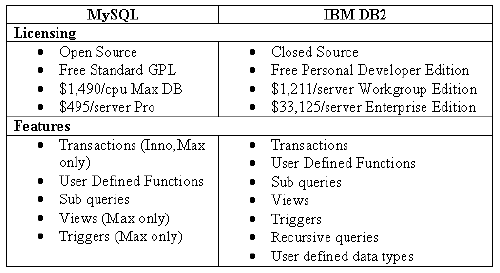
Before we get started, here’s a brief comparison between the licensing and features of MySQL and DB2.
For more information about DB2, see the dedicated subsection of the IBM site.
Pre-requisites
To start using DB2, you’ll need a server with the following installed:
- Apache 2.0 (may work with older versions)
- PHP 3.0.6+ (compiled with the –with-ibm-db2 switch. Note: the latest binary is compiled with code for DB2, so you can just download a binary if you like. Not tested with PHP5)
- DB2 8.1+ (may work with older versions)
If you’re having trouble installing any of these components, see
this article to troubleshoot the installation.
Also, don’t forget to download this tutorial’s code — it’ll com in handy as you work through the follwing procedures.
Setup
Ok, so everything is installed. Let’s start up the DB2 Control Center. This application is a bit slow, but be patient. It will allow us to manage DB2 with a Graphic User Interface.
1. Create DB
- Press the plus sign beside each ucon in the left panel until you see a list of databases.
- You should see
toolsdbandsample(depending on the options you selected during installation). - Right click the folder labeled
Databasesand chooseCreate > Database using Wizard. - Follow this wizard to create a database in DB2. This may take a few minutes – the timeframe will depend on your system.
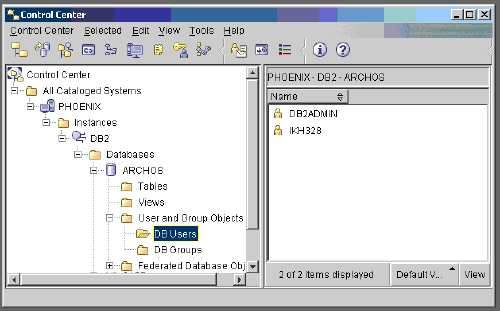
2. Create User
- We will need a user that we can use to connect to this database.
- DB2 uses Operating System Authentication, so you will need to create a local or network user against which DB2 can authenticate.
- Back in the Control Center, click the plus beside your new database. Right-click the folder labeled DB Users and select Add.
- Type the username that you wish to give access to your new database in the select box at the top of this screen. Select all checkboxes to give the user full rights for this database.
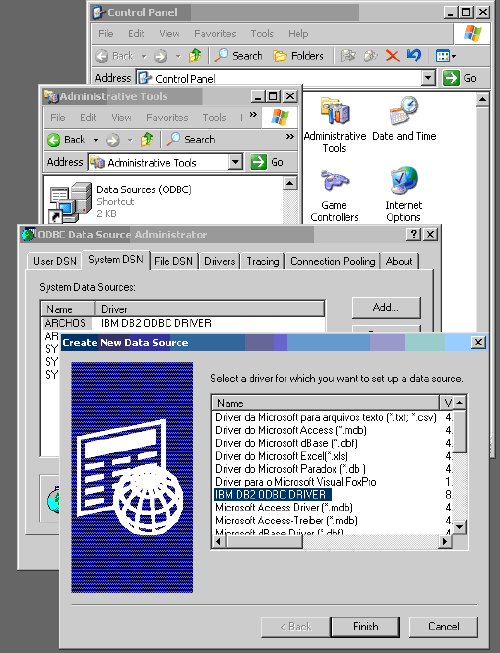
3. Create DSN Link
To connect to DB2, we need a System DSN Link. To create this on a windows machine:
- Go to:
Control Panel Administrative Tools Data Sources (ODBC) - Choose
System DSN and select Add - Select
IBM DB2 ODBC DRIVER - Now type the name for this DSN Link and choose the database we just created
Enough Setup!
Well, that was fun. Now, let’s start to build our PHP application. I don’t really like the way ODBC database calls are handled in PHP, so let’s write a Database Class that we can use whenever we want to connect to DB2.
<?php


class DB2

{

  var $handle;


  // bool connect(string $dsn, string $user, stirng $pass)

  function connect($dsn, $user, $pass)

  {

    $this->handle = odbc_connect($dsn, $user, $pass);

    if (!$this->handle)

      return false;

    return true;

  }


  // resourceid query(string $sql)

  function query($sql)

  {

    $rs = @odbc_exec($this->handle, $sql);

        if ($rs)

          {

return $rs;

        }

          else

        {

$sErr = "<b>Error:</b> " . $this->getErrorMsgs() . "<br>n";

$sErr .= "<b>SQL:</b> " . $sql;

die($sErr);

}

  }


  // string getErrorMsgs()

function getErrorMsgs()

{

return odbc_errormsg($this->handle);

}


// void disconnect()

  function disconnect()

  {

    if ($this->handle)

      odbc_close($this->handle);

  }

}


?>
We’ll expand this class to encapsulate some more database functionality later, but for now, this should be all we need. Let’s see how we’d go about using this class:
<?php


require_once($HTTP_SERVER_VARS['DOCUMENT_ROOT'] . "/path/to/class.php");


$db = new DB2();

print "connecting to DB2...";

if (!$db->connect("testdb", "username", "password"))

{

  print "Error!n";

  exit();

}

print "Connected!<br>n";


print "Creating Database...";

$sql = "";

$sql .= "CREATE TABLE testtbl (id INTEGER NOT NULL GENERATED";

$sql .= "  ALWAYS AS IDENTITY (START WITH 0, INCREMENT BY 1, NO";

$sql .= "  CACHE), name VARCHAR (64) NOT NULL , created DATE  NOT NULL)";

$db->query($sql);


print "Created Table!<br>n";


print "Disconnecting...";

$db->disconnect();

print "Disconnected!<br>n";


?>
This short application should connect to the database and create a three-column table. Note that the SQL syntax is different from MySQL and others. If you’re having trouble with the SQL syntax, remember that many actions can be completed from the Control Center (and you can click “Show SQL” to see the SQL to do the same action yourself).
Add Functionality to the Class
Now, let’s add the following functionality to our DB class:
- Parse a result set (
fetch) - Number of rows in a result set (
numRows) - Transactions (
transIsOpen,transStart,transCommit,transRollback) - Last Insert ID (
lastInsertID)
Within the DB class, add the following lines of code:
// Member variables used to cache array template to reduce odbc calls

var $lastrs;

var $aTemplate;


  // Generate a template for the column names (cached to reduce odbc calls)

// void genTemplate(resourceid $rs)

function genTemplate($rs)

{

  $numCols = odbc_num_fields($rs);

  $this->aTemplate = array();

  for($i = 0; $i < $numCols; $i++)

    $this->aTemplate[$i] = strtolower(odbc_field_name($rs, $i));

}


  // Creates an associative array for the next row in the result set provided

  // If a column name is provided, return the value for that column name only.

  // Note: must use lower case column names!

// array fetch(resourceid $rs[, string $colname])

function fetch($rs)

{

  if ($rs != $this->lastrs)

  $this->genTemplate($rs);


  // Copy the Values into an array

  $aTmp = array();

  odbc_fetch_into($rs, $aTmp);


  $numCols = sizeof($this->aTemplate);

  // Copy the array into the associative array and return that array

  $aRV = array();

  for($i = 0; $i < $numCols; $i++)

  {

    $aRV[$this->aTemplate[$i]] = $aTmp[$i];

    $aRV[$i] = $aTmp[$i];

  }


  if (func_num_args() > 1)

    return $aRV[func_get_arg(1)];


  return $aRV;

}
When we execute an SQL query, the result of that query is provided to us in a result set. The fetch function will provide us with either an array that represents the current row in the given result set, or, if a column name is provided, a single value from the current row.
It’s important to note that when fetch is called, the cursor is advanced to the next row automatically. So, if you want more than one value from a given row, fetch the whole row into an array, and get the values out using the column names as indices. Calling the fetch function multiple times with different column names will retrieve the value of each column from a different row.
Like any associative array in PHP, the values can also be obtained using numerical indices rather than row names.
// get the number of rows in the current result set

// int numRows(resourceid $rs)

function numRows($rs)

{

  return odbc_num_rows($rs);

}
The above function simply returns the number of rows in a given result set.
// is there a transaction open

// bool transIsOpen()

function transIsOpen()

{

  return !odbc_autocommit($this->handle);

}


  // start an SQL transaction

// void transStart()

function transStart()

{

  odbc_autocommit($this->handle, false);

}


  // commit the current SQL transaction

// void transCommit();

function transCommit()

{

  odbc_commit($this->handle);

  odbc_autocommit($this->handle, true);

}


  // rollback the current SQL transaction

// void transRollback()

function transRollback()

{

  odbc_rollback($this->handle);

  odbc_autocommit($this->handle, true);

}
Now we get into some of the great features of DB2, including transactions. A transaction is a collection of SQL commands grouped as an atomic unit. A given transaction either executes entirely or not at all. This is beneficial in situations in which data integrity is essential.
When we’re not using transactions (i.e. when no transaction is open), queries are automatically committed to the database. This allows us to make queries to the database without having to start and end transactions.
The other situation in which transactions are important is when we wish to find the last ID inserted into a particular table. The following function will return the last id:
// get the last inserted ID into the specified table

// int lastInsertID(string $tblName)

function lastInsertID($tblName)

{

  if ($this->transIsOpen())

  {

    $sql = "SELECT SYSIBM.IDENTITY_VAL_LOCAL() AS id FROM " . $tblName;

    $rs = $this->query($sql);

    return $this->fetch($rs, "id");

  }

  return -1;

}
This function is similar to the mysql_insert_id() function. Determining the last inserted ID is essential for generated columns, yet it’s not well-documented (I actually had some correspondence with IBM to figure this out) so — enjoy! It’s now exposed in all its beauty.
Escape a Single Quotation Mark
Although it is common to escape a quote with a backslash() in programming languages such as C, PHP and Java, DB2 does not permit the use of backslashes in strings (unlike MySQL). You can use two quotes in a row to escape a single quotation mark, as shown here:
INSERT INTO testtbl (name, created)

    VALUES ('Mark''s favorite popsicle flavour', '2004-01-01')
This will insert with the name, Mark’s favorite popsicle flavour.
It is also relevant to note that DB2 does not allow you to enclose string within double quotation marks as MySQL does. You must use single quotation marks inside a query to enclose a string.
Table Modification
Although it is permitted by the SQL99 Standard, DB2 does not allow you to alter tables in certain ways:
- Alter Column – DB2 does not allow you to alter the data type, default value or any other attribute of a column once it has been created.
- Delete Column – You can not remove a column from a table once the table has been created.
You can still create, remove and modify indexes on columns, as well as add new columns. You can always remove, modify and create rows via DELETE, UPDATE and INSERT statements. If you need to complete one of the above operations on a table, the best method is to rename the old table, and create a new table.
You can copy data from one table to another using in the INSERT statement. Let’s say you want to copy data from a table named oldTbl into newTbl. You can achieve this as follows:
INSERT INTO newTbl (col1, col2, col3)

SELECT (col1, col2, col3) FROM oldTbl
This will copy the contents from oldTbl into newTbl.
Statement
I’m surprised that no database other than MySQL supports the LIMIT clause. It’s not part of the SQL99 standard, but it’s so convenient. Some of the functionality provided by the LIMIT clause can be duplicated in MS SQL using the TOP clause, and DB2 has a similar clause (although it is rather long winded). Unfortunately, like the TOP clause, DB2’s LIMIT attempt can only be used on SELECT statements. Here’s an example:
SELECT * FROM testtbl WHERE id > 10 FETCH ONLY FIRST 4 ROWS
I’m not exactly sure why this clause is so long. Possibly in the future it will have more functionality, but for now it is more interesting that useful.
Conclusion
I hope you’ve enjoyed your first encounter with DB2. Although best known for its size and obscure commercials, IBM’s Standard Query Language (SQL) is an excellent database product of which you can take advantage in your PHP applications!
There are many areas in which the DB2 SQL Dialect differs from that of MySQL, but your initial frustrations should pay off in speed and performance benefits (and the joy of learning another industry standard application)! For more information, check out the official DB2 Documentation.
Frequently Asked Questions about PHP Database DB2
How can I connect to a DB2 database using PHP?
To connect to a DB2 database using PHP, you need to use the db2_connect() function. This function requires three parameters: the database, the username, and the password. Here’s an example of how to use it:$db = db2_connect('DATABASE_NAME', 'USERNAME', 'PASSWORD');if ($db) {
echo "Connection succeeded.";} else {
echo "Connection failed.";}
Remember to replace ‘DATABASE_NAME’, ‘USERNAME’, and ‘PASSWORD’ with your actual database name, username, and password.
What is the purpose of the ibm_db2 extension in PHP?
The ibm_db2 extension is a module in PHP that provides a set of functions for accessing and manipulating DB2 databases. This extension supports both DB2 Universal Database and IBM Cloudscape. It allows PHP applications to perform operations like connecting to a DB2 database, executing statements, fetching results, and handling errors.
How can I execute a statement using PHP and DB2?
To execute a statement using PHP and DB2, you can use the db2_exec() function. This function requires two parameters: the connection resource and the statement string. Here’s an example:$sql = "SELECT * FROM table";$stmt = db2_exec($db, $sql);
In this example, $db is the connection resource obtained from db2_connect(), and $sql is the SQL statement you want to execute.
How can I handle errors in PHP when working with DB2?
When working with DB2 in PHP, you can handle errors using the db2_stmt_error() and db2_stmt_errormsg() functions. These functions return the SQLSTATE and the error message respectively for the last run SQL statement. Here’s an example:if (!$stmt) {
echo "Statement execution failed: ";
echo "SQLSTATE: ".db2_stmt_error()."\n";
echo "Error message: ".db2_stmt_errormsg()."\n";}
In this example, if the statement execution fails, the error SQLSTATE and message are printed.
How can I fetch results from a DB2 database using PHP?
To fetch results from a DB2 database using PHP, you can use the db2_fetch_assoc() function. This function fetches a result row as an associative array. Here’s an example:while ($row = db2_fetch_assoc($stmt)) {
print_r($row);}
In this example, the db2_fetch_assoc() function is used in a loop to fetch all rows from the result set.
How can I close a DB2 connection in PHP?
To close a DB2 connection in PHP, you can use the db2_close() function. This function requires one parameter: the connection resource. Here’s an example:db2_close($db);
In this example, $db is the connection resource obtained from db2_connect().
How can I insert data into a DB2 database using PHP?
To insert data into a DB2 database using PHP, you can use the db2_exec() function with an INSERT INTO statement. Here’s an example:$sql = "INSERT INTO table (column1, column2) VALUES ('value1', 'value2')";db2_exec($db, $sql);
In this example, ‘table’ is the name of the table, ‘column1’ and ‘column2’ are the column names, and ‘value1’ and ‘value2’ are the values you want to insert.
How can I update data in a DB2 database using PHP?
To update data in a DB2 database using PHP, you can use the db2_exec() function with an UPDATE statement. Here’s an example:$sql = "UPDATE table SET column1='new_value' WHERE condition";db2_exec($db, $sql);
In this example, ‘table’ is the name of the table, ‘column1’ is the column name, ‘new_value’ is the new value you want to set, and ‘condition’ is the condition that must be met for the row to be updated.
How can I delete data from a DB2 database using PHP?
To delete data from a DB2 database using PHP, you can use the db2_exec() function with a DELETE FROM statement. Here’s an example:$sql = "DELETE FROM table WHERE condition";db2_exec($db, $sql);
In this example, ‘table’ is the name of the table, and ‘condition’ is the condition that must be met for the row to be deleted.
How can I retrieve the number of rows affected by a DB2 query in PHP?
To retrieve the number of rows affected by a DB2 query in PHP, you can use the db2_num_rows() function. This function requires one parameter: the statement resource. Here’s an example:$num_rows = db2_num_rows($stmt);echo "Number of rows affected: $num_rows";
In this example, $stmt is the statement resource obtained from db2_exec().
 Ian Hopkins
Ian Hopkins is a second Year Computer Science student at the University of Dalhousie in Halifax, Nova Scotia, Canada. He is currently employed at the University of Saskatchewan as a Research Assistant on a Natural Science and Engineering Research Council (NSERC) Grant.