
What is XML?
The essence of XML is in its name: Extensible Markup Language.- Extensible: XML is extensible. It lets you define your own tags, the order in which they occur, and how they should be processed or displayed. Another way to think about extensibility is to consider that XML allows all of us to extend our notion of what a document is: it can be a file that lives on a file server, or it can be a transient piece of data that flows between two computer systems (as in the case of Web Services).
- Markup: The most recognizable feature of XML is its tags, or elements (to be more accurate). In fact, the elements you’ll create in XML will be very similar to the elements you’ve already been creating in your HTML documents. However, XML allows you to define your own set of tags.
- Language: XML is a language that’s very similar to HTML. It’s much more flexible than HTML because it allows you to create your own custom tags. However, it’s important to realize that XML is not just a language. XML is a meta-language: a language that allows us to create or define other languages. For example, with XML we can create other languages, such as RSS, MathML (a mathematical markup language), and even tools like XSLT. More on this later.
What is XML used for?
XML was created because HTML is specifically designed to describe documents for display in a Web browser, and not much else. It becomes cumbersome if you want to display documents in a mobile device or do anything that’s even slightly complicated, such as translating the content from German to English. HTML’s sole purpose is to allow anyone to quickly create Web documents that can be shared with other people. XML, on the other hand, isn’t just suited to the Web – it can be used in a variety of different contexts, some of which may not have anything to do with humans interacting with content (for example, Web Services use XML to send requests and responses back and forth). HTML rarely (if ever) provides information about how the document is structured or what it means. In layman’s terms, HTML is a presentation language, whereas XML is a data-description language. For example, if you were to go to any ecommerce Website and download a product listing, you’d probably get something like this:<!DOCTYPE html PUBLIC "-//W3C//DTD XHTML 1.0 Transitional//EN"
"https://www.w3.org/TR/xhtml1/DTD/xhtml1-transitional.dtd">
<html xmlns="https://www.w3.org/1999/xhtml">
<head>
<title>ABC Products</title>
<meta http-equiv="Content-Type"
content="text/html; charset=iso-8859-1" />
</head>
<body>
<h1>ABC Products</h1>
<h2>Product One</h2>
<p>Product One is an exciting new widget that will simplify your
life.</p>
<p><b>Cost: $19.95</b></p>
<p><b>Shipping: $2.95</b></p>
<h2>Product Two</h2>
...
<h3>Product Three</h3>
<p><i>Cost: $24.95</i></p>
<p>This is such a terrific widget that you will most certainly
want to buy one for your home and another one for your
office!</p>
...
</body>
</html><h2> tag in the above document has been used to tag a product name within a product listing. Furthermore, a human might be able to guess that the first paragraph after an <h2> holds the description, and that the next two paragraphs contain price and shipping information, in bold.
However, even a cursory glance at the rest of the document reveals some very human errors. For example, the last product name is encapsulated in <h3> tags, not <h2> tags. This last product listing also displays a price before the description, and the price is italicized instead of appearing in bold.
A computer program (and even some humans) that tried to decipher this document wouldn’t be able to make the kinds of semantic leaps required to make sense of it. The computer would be able only to render the document to a browser with the styles associated with each tag. HTML is chiefly a set of instructions for rendering documents inside a Web browser; it’s not a method of structuring documents to bring out their meaning.
If the above document were created in XML, it might look a little like this:
<?xml version="1.0"?>
 <productListing title="ABC Products">
  <product>
    <name>Product One</name>
    <description>Product One is an exciting new widget that will
      simplify your life.</description>
    <cost>$19.95</cost>
    <shipping>$2.95</shipping>
  </product>
  <product>
    <name>Product Two</name>
    ...
  </product>
  <product>
    <name>Product Three</name>
    <description>This is such a terrific widget that you will
      most certainly want to buy one for your home and another one
      for your office!</p>
    <cost>$24.95</cost>
    <shipping>$0.00</shipping>
  </product>
  ...
</productListing><product> tag look like in a browser? Beats me – we haven’t defined that yet. Later on, we’ll see how you can use technologies like CSS and XSLT to transform your XML into any format you like. Essentially, XML allows you to separate information from presentation – just one of its many powerful abilities.
When we concentrate on a document’s structure, as we’ve done here, we are better able to ensure that our information is correct. In theory, we should be able to look at any XML document and understand instantly what’s going on. In the example above, we know that a product listing contains products, and that each product has a name, a description, a price, and a shipping cost. You could say, rightly, that each XML document is self-describing, and is readable by both humans and software.
Now, everyone makes mistakes, and XML programmers are no exception. Imagine that you start to share your XML documents with another developer or company, and, somewhere along the line, someone places a product’s description after its price. Normally, this wouldn’t be a big deal, but perhaps your Web application requires that the description appears after the product name every time.
To ensure that everyone plays by the rules, you need a DTD (a document type definition), or schema. Basically, a DTD provides instructions about the structure of your particular XML document. It’s a lot like a rule book that states which tags are legal, and where. Once you have a DTD in place, anyone who creates product listings for your application will have to follow the rules. We’ll get into DTDs a little later. For now, though, let’s continue with the basics.
XML Structure
From the casual observer’s viewpoint, a given XML document, such as the one we saw in the previous section, appears to be no more than a bunch of tags and letters. But there’s more to it than that! Let’s consider our XML example from a structural standpoint. No, not the kind of structure we bring to a document by marking it up with XML tags; let’s look at this example on a more granular level. I want to examine the contents of a typical XML file, character by character. The simplest XML elements contain an opening tag, a closing tag, and some content. The opening tag begins with a left angle bracket (<), followed by an element name that contains letters and numbers (but no spaces), and finishes with a right angle bracket (>). In XML, content is usually parsed character data. It could consist of plain text, other XML elements, and more exotic things like XML entities, comments, and processing instructions (all of which we’ll see later). Following the content is the closing tag, which exhibits the same spelling and capitalization as your opening tag, but with one tiny change: a / appears right before the element name.
Here are a few examples of valid XML elements:
<myElement>some content here</myElement>
 <elements>
  <myelement>one</myelement>
  <myelement>two</myelement>
 </elements>
Elements, Tags, or Nodes?
I’ll refer to XML elements, XML tags, and XML nodes at different points in this article. What’s the deal? Well, for the layman, these terms are interchangeable, but if you want to get technical (and who’d want to do that?) each has a very precise meaning:- An element consists of an opening tag, its attributes, any content, and a closing tag.
- A tag – either opening or closing – is used to mark the start or end of an element.
- A node is a part of the hierarchical structure that makes up an XML document. “Node” is a generic term that applies to any type of XML document object, including elements, attributes, comments, processing instructions, and plain text.
<myElement> tag is different from the <MYELEMENT> tag, and both are different from the <myELEMENT> tag. If your opening tag is <myELEMENT> and your closing tag is </Myelement>, your document won’t be valid.
If you use attributes on any elements, then attribute values must be single- or double-quoted. No longer can you get by with bare attribute values like you did in HTML! Let’s see an example. The following is okay in HTML:
<h1 class=topHeader><h1 class="topHeader"><b>Some text that is bolded, some that is <i>italicized</b></i>.Attributes
Did you notice the<productListing> opening tag in our example? Inside the tag, following the element name, was the data title="ABC Products". This is called an attribute.
You can think of attributes as adjectives – they provide additional information about the element that may not make any sense as content. If you’ve worked with HTML, you’re familiar with such attributes as the src (file source) on the <img> tag.
What information should be contained in an attribute? What should appear between the tags of an element? This is a subject of much debate, but don’t worry, there really are no wrong answers here. Remember: you’re the one defining your own language. Some developers (including me!) apply this rule of thumb: use attributes to store data that doesn’t necessarily need to be displayed to a user of the information. Another common rule of thumb is to consider the length of the data. Potentially large data should be placed inside a tag; shorter data can be placed in an attribute. Typically, attributes are used to “embellish” the data contained within the tag.
Let’s examine this issue a little more closely. Let’s say that you wanted to create an XML document to keep track of your DVD collection. Here’s a short snippet of the code you might use:
<dvdCollection>
  <dvd>
    <id>1</id>
    <title>Raiders of the Lost Ark</title>
    <release-year>1981</release-year>
    <director>Steven Spielberg</director>
    <actors>
      <actor>Harrison Ford</actor>
      <actor>Karen Allen</actor>
      <actor>John Rhys-Davies</actor>
    </actors>
  </dvd>
  ....
</dvdCollection><dvd> element instead, like this:
<dvd id="1"><actor> tags – we could include much more information here. One way to do so is with the addition of attributes:
<actor type="superstar" gender="male" age="50">Harrison Ford
</actor>
<actor type="superstar">
<name>Harrison Ford</name>
<gender>male</gender>
<age>50</age>
</actor>
img and br elements in HTML. In the case of img, for example, all the element’s information is contained in its tag’s attributes. The <br> tag, on the other hand, does not normally contain any attributes – it just signifies a line break.
Remember that in XML all opening tags must be matched by a closing tag. For empty elements, you can use a single empty-element tag to replace this:
<myEmptyElement></myEmptyElement><myEmptyElement/>/ at the end of this tag basically tells the parser that the element starts and ends right here. It’s an efficient shorthand method that you can use to mark up empty elements quickly.
The XML Declaration
The line right at the top of our example is called the XML declaration:
<?xml version="1.0"?>< entity inserts a literal < character into a document. You can’t use the actual character because it would be treated as the start of a tag, so you replace it with the appropriate entity instead.
XML, true to its extensible nature, allows you to create your own entities. Let’s say that your company’s copyright notice has to go on every single document. Instead of typing this notice over and over again, you could create an entity reference called copyright_notice with the proper text, then use it in your XML documents as ©right_notice;. What a time-saver!
We’ll cover entities in more detail later on.
More than Structure…
XML documents are more then just a sequence of elements. If you take another, closer look at our product or DVD listing examples, you’ll notice two things:
- The documents are self-describing, as we’ve already discussed.
- The documents are really a hierarchy of nested objects.
5551238888. This string can represent anything from a laptop’s serial number, to a pharmacy’s prescription ID, to a phone number in the United States. But the only way to turn this data into information (and therefore make it useful) is to add context to it – once you have context, you can be sure about what the data represents. In short, <phone country="us">5551238888</phone> leaves no doubt that this seemingly arbitrary string of numbers is in fact a U.S. phone number.
When you take into account the second point – that an XML document is really a hierarchy of objects – all sorts of possibilities open up. Remember what we discussed before – that, in an XML document, one element contains all the others? Well, that root element becomes the root of our hierarchical tree. You can think of that tree as a family tree, with the root element having various children (in this case, product elements), and each of those having various children (name, description, and so on). In turn, each product element has various siblings (other product elements) and a parent (the root), as shown in Figure 1.1, “The logical structure of an XML document.”.
Figure 1.1. The logical structure of an XML document.
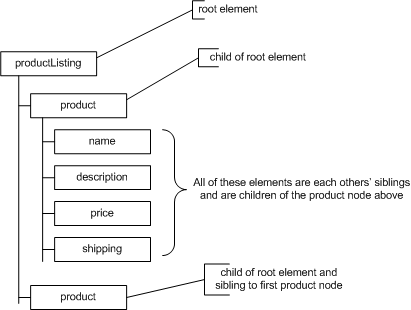 Because what we have is a tree, we should be able to travel up and down it, and from side to side, with relative ease. From a programmatic stance, most of your work with XML will focus on properly creating and navigating XML structures.
There’s one final point about hierarchical trees that you should note. Before, we talked about transforming data into information by adding context. Well, when we start building hierarchies of information that indicate natural relationships (known as taxonomies), we’ve just taken the first giant leap toward turning information into knowledge.
Because what we have is a tree, we should be able to travel up and down it, and from side to side, with relative ease. From a programmatic stance, most of your work with XML will focus on properly creating and navigating XML structures.
There’s one final point about hierarchical trees that you should note. Before, we talked about transforming data into information by adding context. Well, when we start building hierarchies of information that indicate natural relationships (known as taxonomies), we’ve just taken the first giant leap toward turning information into knowledge.
Styling and XML
Earlier in this article, I made a point about XML allowing you to separate information from presentation. I also mentioned that you could use other technologies, like CSS (Cascading Style Sheets) and XSLT (Extensible Stylesheet Language Transformations), to make the information display in different contexts. Note: Notice that in XSLT, it’s “stylesheet,” but in CSS it’s “style sheet”! Because we’ve taken the time to create XML documents, our information is no longer locked up inside proprietary formats such as word processors or spreadsheets. Furthermore, it no longer has to be “re-created” every time you want to create alternate displays of that information: all you have to do is create a style sheet or transformation to make your XML presentable in a given medium. For example, if you stored your information in a word processing program, it would contain all kinds of information about the way it should appear on the printed page – lots of bolding, font sizes, and tables. Unfortunately, if that document also had to be posted to the Web as an HTML document, someone would have to convert it (either manually or via software), clean it up, and test it. Then, if someone else made changes to the original document, those changes wouldn’t cascade to the HTML version. If yet another person wanted to take the same information and use it in a slide presentation, they might run the risk of using outdated information from the HTML version. Even if they did get the right information into their presentation, you’d still need to track three locations in which your information lived. As you can see, it can get pretty messy! Now, if the same information were stored in XML, you could create three different XSLT files to transform the XML into HTML, a slide presentation, and a printer-friendly file format such as PostScript. If you made changes to the XML file, the other files would also change automatically once you passed the XML file through the process. (This notion, by the way, is an essential component of single-sourcing – i.e. having a “single source” for any given information that’s reused in another application.) As you can see, separating information from presentation makes your XML documents reusable, and can save hassles and headaches in environments in which a lot of information needs to be stored, processed, handled, and exchanged.Well-Formedness and Validity
One of the most powerful advantages of XML, of course, is that it allows you to define your own language. However, this most powerful feature also exposes a great weakness of XML. If all of us start defining our own languages, we run the risk of being unable to understand anything anyone else says. Thus, the creators of XML had to set down some rules that would describe a “legal” XML document. There are two levels of “legality” in XML:- Well-formedness
- Validity
- An XML document must contain a single root element that contains all other elements.
- All elements must be properly nested.
- All elements must be closed either with a closing tag or with a “self-closing” empty-element tag (i.e.
<tag/>). - All attribute values must be quoted.
XML in Practice
Now we’re going to dig a little deeper into XML as we talk about namespaces, XHTML, XSLT, and CSS. I’d like to zoom out a little and introduce you to some of the wacky siblings that make up the XML “Family of Technologies.” Although I’m going to list a number of tools and technologies here, we’ll cover only a few in this article.XSLT
XSLT stands for Extensible Stylesheet Language Transformations. It is both a style sheet specification and a kind of programming language that allows you to transform an XML document into the format of your choice: stripped ASCII text, HTML, RTF, and even other dialects of XML.XPath
XPath is a language for locating and processing nodes in an XML document. Because each XML document is, by definition, a hierarchical structure, it becomes possible to navigate this structure in a logical, formal way (i.e. by following a path).DTD and XML Schema
A document type definition (DTD) is a set of rules that governs the order in which your elements can be used, and the kind of information each can contain. XML Schema is a newer standard with capabilities that extend far beyond those of DTDs. While a DTD can provide only general control over element ordering and containment, schemas are a lot more specific. They can, for example, allow elements to appear only a certain number of times, or require that elements contain specific types of data such as dates and numbers. Both technologies allow you to set rules for the contents of your XML documents. If you need to share your XML documents with another group, or you must rely on receiving well-formed XML from someone else, these technologies can help ensure that your particular set of rules is properly followed.XML Namespaces
The ability of XML to allow you to define your own elements provides flexibility and scope. But it also creates the strong possibility that, when combining XML content from different sources, you’ll experience clashes between code in which the same element names serve very different purposes. For example, if you’re running a bookstore, your use of<title> tags in XML may be used to track book titles. A mortgage broker would use <title> in a different way – perhaps to track the title on a deed. A dentist or doctor might use <title> to track patients’ formal titles (Mr., Ms., Mrs., or Dr.) on their medical records. Try to combine all three types of information into one system (or even one document), and you’ll quickly see how problems can arise.
XML namespaces attempt to keep different semantic usages of the same XML elements separate and unambiguous. In our example, each person could define their own namespace and then prepend the name of their namespace to specific tags: <book:title> is different from <broker:title> and <medrec:title>. Namespaces, by the way, are one of the technologies that make XSLT and XSD work.
XHTML
XHTML stands for Extensible Hypertext Markup Language. Technically speaking, it’s a reformulation of HTML 4.01 as an application of XML, and is not part of the XML family of technologies. To save your brain from complete meltdown, it might be simplest to think of XHTML as a standard for HTML markup tags that follow all the well-formedness rules of XML we covered earlier. What’s the point of that, you might ask? Well, there are tons and tons and tons of Websites out there that already use HTML. No one in their right mind could reasonably expect them all to switch to XML overnight. But we can expect that some of these pages – and a large percentage of the new pages that are being coded as you read this – will make the transition thanks to XHTML. As you can see, the XML family of technologies is a pretty big group – those XML family reunions are undoubtedly interesting! It’s also important to note that these technologies are open standards-based, which means that any new XML technologies (or proposed changes to existing ones) must follow a public process set down by the W3C (the World Wide Web Consortium) in order to gain acceptance in the community. Although this means that some ideas take quite a while to reach fruition, and tend to be built by committee, it also means that no single vendor is in total control of XML. And this, as Martha Stewart might say, is a good thing.A Closer Look at XHTML
XHTML can be defined by the following statements:- XHTML stands for Extensible HyperText Markup Language.
- XHTML is designed to replace HTML.
- XHTML uses the HTML 4.01 tag set, but is written using the XML syntax rules.
- XHTML is a stricter, cleaner version of HTML.
<html><title>My example</title>
<h1>Hello</h1><p><b><i>Hello</b>Hello- XHTML documents must contain a root element that contains all other elements. (In most cases, the
htmlelement!) - XHTML elements must be properly nested.
<p>This is a <b>sentence.</b></p>- All XHTML elements must have closing tags (even empty ones).
<br />
<td></td><!DOCTYPE html
PUBLIC "-//W3C//DTD XHTML 1.0 Strict//EN"
"https://www.w3.org/TR/xhtml1/DTD/xhtml1-strict.dtd"><!DOCTYPE html
PUBLIC "-//W3C//DTD XHTML 1.0 Transitional//EN"
"https://www.w3.org/TR/xhtml1/DTD/xhtml1-transitional.dtd"><!DOCTYPE html
PUBLIC "-//W3C//DTD XHTML 1.0 Frameset//EN"
"https://www.w3.org/TR/xhtml1/DTD/xhtml1-frameset.dtd"><!DOCTYPE html PUBLIC "-//W3C//DTD XHTML 1.0 Transitional//EN"
"https://www.w3.org/TR/xhtml1/DTD/xhtml1-transitional.dtd">
<html xmlns="https://www.w3.org/1999/xhtml">
<head>
<title>A very simple XHTML document</title>
<meta http-equiv="content-type"
content="text/html; charset=iso-8859-1" />
</head>
<body>
<p>a simple paragraph that contains a properly formatted<br />
break and some <b><i>properly nested</i></b> formatting.</p>
<div><img src="myphoto.jpg" alt="notice that all my quotes are in
place for attribute values" /></div>
</body>
</html>XML Namespaces
XML Namespaces were invented to rectify a common problem: the collision of documents using identical element names for different data. Let’s revisit our namespace example from the introduction. Imagine you were running a bookstore and had an inventory file (calledinventory.xml, naturally), in which you used a title element to store book titles. Let’s also say that – unlikely though it sounds – your XML document becomes mixed in with a mortgage broker’s master record file. In this file, the mortgage broker has used title to store information about a property’s legal title.
A human being could probably figure out that one title has nothing to do with the other, but an application that tried to sort it out would go nuts. We need to have a way to distinguish between the two different semantic universes in which these identical terms exist.
Let’s get even more ambiguous: imagine you had an inventory.xml file in your bookstore that used the title element to store book titles, and a separate sales.xml file that used the title element to store the same information, but in a completely different context. Your inventory file stores information about books on the shelf, but the sales file stores information about books that have been bought by customers.
In either situation, regardless of the chasm that lies between the contexts of these identical terms, we need a way to properly label each context.
Namespaces to the rescue! XML namespaces allow you to create a unique namespace based on a URI (Uniform Resource Identifier), give that namespace a prefix, and apply that prefix to XML document elements.
Declaring Namespaces
To use and declare a namespace, we must first tie the namespace to a URI. Notice that I didn’t say URL – a specific location that you can reach (although a URI can be a URL). A URI is simply a unique identifier that distinguishes one thing (say, an XML document standard) from another. URIs can take the following forms:URL
Uniform Resource Locator: a specific protocol, machine address, and file path (e.g.http://www.tripledogdaremedia.com/index.php).
URN
Uniform Resource Name: a persistent name that doesn’t point to an actual location for the resource, but still identifies it uniquely. For example, all published books have an ISBN. The ISBN uniquely identifies the book, but nowhere in the ISBN is there any indication as to which shelf it sits on in any particular bookstore. However, armed with the ISBN, you could walk into the store, ask an employee to search for you, and they could take you right to the book (provided, of course, that it was in stock. The following are examples of good URIs:http://www.tripledogdaremedia.com/XML/Namespaces/1
urn:bookstore-inventory-namespaceinv="urn:bookstore-inventory-namespace"xmlns:, like this:
xmlns:inv="urn:bookstore-inventory-namespace"<inv:title>Build Your Own XML-Powered Web Site</inv:title>
<title>Title Deed to the house on 123 Main St., YourTown</title><inv:title> is very different from <title>.
But, where do we put our namespace declaration?
Placing Namespace Declarations in your XML Documents
In most cases, placing your namespace declarations will be rather easy. They’re commonly located in the root element of a document, like so:<inventory xmlns:inv="urn:bookstore-inventory-namespace">
...
</inventory>xsl prefix in the very element in which we define the XSL namespace:
<xsl:stylesheet
    xmlns:xsl="https://www.w3.org/1999/XSL/Transform"
    xmlns="https://www.w3.org/1999/xhtml"
version="1.0">Using Default Namespaces
It would become pretty tiresome to have to type a prefix for every single element in a document. Fortunately, you can declare a default namespace that doesn’t contain a prefix. This namespace will apply to all elements that don’t contain prefixes. Let’s take another look at a typical opening<xsl:stylesheet> tag for an XSLT file:
<xsl:stylesheet
    xmlns:xsl="https://www.w3.org/1999/XSL/Transform"
    xmlns="https://www.w3.org/1999/xhtml"
version="1.0">xmlns="https://www.w3.org/1999/xhtml" In an XSLT file, this namespace governs all elements that aren’t specifically prefixed as XSLT elements, identifying them as XHTML tags. On the other side of the coin, all XSLT elements must be given the xsl: prefix.
Using XSLT
XSLT, as I mentioned earlier, stands for Extensible Stylesheet Language Transformations. Think of it as a tool that you can use to transform your XML documents into other documents. Here are some of the possibilities:- Transform XML into HTML or raw ASCII text.
- Transform XML into other dialects of XML.
- Pull out all the passages tagged as Spanish, or French, or German to create foreign-language versions of your XML document.
<para> tag in the input document, a rule could instruct XSLT to convert it into an HTML <p> tag.
Because XSLT can be a little bewildering even for veteran programmers, the best way to tackle it is to walk through a series of examples. That way, I can give you the practical information you’ll need to get started, and you can learn the key concepts along the way. As with XHTML, countless books, articles, and Websites are devoted to XSLT; use these to continue your education.
Your First XSLT Exercise
Let’s get started with XSLT. For our first exercise, we’ll reuse the very simple Letter to Mother example we saw in the CSS section. We’ll also create a very basic Extensible Stylesheet Language (XSL) file to transform that XML. Keeping both these elements simple will give us the opportunity to step through the major concepts involved. First, let’s create the XSL file. This file will contain all the instructions we’ll need in order to transform the XML elements into raw text. In what will become a recurring theme in the world of XML, XSL files are in fact XML files in their own right. They must therefore follow the rules that apply to all XML documents: an XSL file must contain a root element, all attribute values must be quoted, and so on. All XSL documents begin with astylesheet element This element contains information that the XSLT processor needs to do its job:
Example 2.4. letter2text.xsl (excerpt)
<xsl:stylesheet version="1.0"
xmlns:xsl="https://www.w3.org/1999/XSL/Transform">version attribute is required. In most cases, you’d use 1.0, as this is the most widely supported version at the time of this writing.
The xmlns:xsl attribute is used to declare an XML namespace with the prefix xsl. For your stylesheet transformation to work at all, you must declare an XML namespace for the URI https://www.w3.org/1999/XSL/Transform in your opening <stylesheet> tag. In our example, we will use an xsl prefix on all the stylesheet-related tags in our XSL documents to associate them with this namespace. You’ll find this is common practice when working with XSLT.
The next element will be the output element, which is used to define the type of output you want from the XSL file. For this first example, we’ll use text as our method:
Example 2.5. letter2text.xsl (excerpt)
<xsl:output method="text"/>method attribute include html and xml, but we’ll cover those a little later.
Now we come to the heart of XSLT – the template and apply-templates elements. Together, these two elements make the transformations happen.
Put simply, the XSLT processor (for our immediate purposes, the browser) starts reading the input document, looking for elements that match any of the template elements in our style sheet. When one is found, the contents of the corresponding template element tells the processor what to output before continuing its search. Where a template contains an apply-templates element, the XSLT processor will search for XML elements contained within the current element and apply templates associated with them.
There are some exceptions and additional complications that we’ll see as we move forward, but for now, that’s really all there is to it.
The first thing we want to do is match the letter element that contains the rest of our document. This is fairly straightforward:
Example 2.6. letter2text.xsl (excerpt)
<xsl:template match="/letter">
<xsl:apply-templates select=”*”/>
</xsl:template>
This very simple batch of XSLT simply states: “when you encounter a letter element at the root of the document, apply any templates associated with the elements it contains.” Let’s break this down.
The <xsl:template> tag is used to create a template, with the match attribute indicating which element(s) it should match. The value of this attribute is an XPath expression (we’ll learn more about XPath later). In this case, the /letter value indicates that the template should match the letter elements at the root of the document. Were the value simply letter, the template would match letter elements throughout the document.
Now, this <xsl:template> tag contains only an <xsl:apply-templates> tag, which means that it doesn’t actually output anything itself. Rather, the <xsl:apply-templates> tag sends the processor looking for other elements with matching templates.
By default, apply-templates will match not only elements, but text and even whitespace between the elements as well. XSLT processors have a set of default, or implicit templates, one of which simply outputs any text or whitespace it encounters. Since we want to ignore any text or whitespace that appears between the tags inside <letter>, we use the select attribute of apply-templates to tell the processor to look for child elements only in its search. We do this with another XPath expression: * means “all child elements of the current element.”
Now, we’ve got our processor looking for elements inside letter, so we’d better give it some templates to match them!
Example 2.7. letter2text.xsl (excerpt)
<xsl:template match="to">
TO: <xsl:apply-templates/>
</xsl:template>
<xsl:template match=”from”>
FROM: <xsl:apply-templates/>
</xsl:template>
<xsl:template match=”message”>
MESSAGE: <xsl:apply-templates/>
</xsl:template>
Each of these templates matches one of the elements we expect to find inside the letter element: to, from, and message. In each case, we output a text label (e.g. TO:) and then use apply-templates to output the contents of the tag (remember, in the absence of a select attribute that says otherwise,apply-templates will output any text contained in the tags automatically).
The last thing we have to do in the XSL file is close off the stylesheet element that began the file:
</xsl:stylesheet>letter2text.xsl (excerpt)
<xsl:stylesheet version="1.0"
    xmlns:xsl="https://www.w3.org/1999/XSL/Transform">
  <xsl:output method="text"/>
  <xsl:template match="/letter">
    <xsl:apply-templates select="*"/>
  </xsl:template>
  <xsl:template match="to">
    TO: <xsl:apply-templates/>
  </xsl:template>
  <xsl:template match="from">
    FROM: <xsl:apply-templates/>
  </xsl:template>
  <xsl:template match="message">
    MESSAGE: <xsl:apply-templates/>
  </xsl:template>
</xsl:stylesheet>TO: Mom
FROM: Tom
MESSAGE: Happy Mother's DayTO:), then the whitespace in and around that text should be passed along to the output.
Avoid Whitespace Insanity
The vast majority of XML books and tutorials out there completely ignore these whitespace treatment issues. And while it’s true that whitespace doesn’t matter a lot of the time when you’re dealing exclusively with XML documents (as opposed to formatted text output), it’s likely to sneak up on you and bite you in the butt eventually. Best to get a good grasp of it now, rather than waiting for insanity to set in when you least expect it.
The <xsl:text> tag is useful for controlling the effects of whitespace in our style sheets. All it does is output the text it contains, even if it is just whitespace. Here’s the adjusted version of our style sheet, with <xsl:text> tags used to isolate text we want to output:
Example 2.9. letter2text.xsl
<xsl:stylesheet version="1.0"
    xmlns:xsl="https://www.w3.org/1999/XSL/Transform">
  <xsl:output method="text"/>
  <xsl:template match="/letter">
    <xsl:apply-templates select="*"/>
  </xsl:template>
  <xsl:template match="to">
    <xsl:text>TO: </xsl:text>
    <xsl:apply-templates/>
    <xsl:text>
 </xsl:text>
  </xsl:template>
  <xsl:template match="from">
    <xsl:text>FROM: </xsl:text>
    <xsl:apply-templates/>
    <xsl:text>
 </xsl:text>
  </xsl:template>
  <xsl:template match="message">
    <xsl:text>MESSAGE: </xsl:text>
    <xsl:apply-templates/>
    <xsl:text>
 </xsl:text>
  </xsl:template>
</xsl:stylesheet>TO:) followed by a single space, then finishes off with a line break. All the other whitespace in the style sheet is ignored, since it isn’t mixed with text. This gives us the fine control over formatting that we need when outputting a plain text file.
Are we done yet? Not quite. We have to go back and add to our XML document a style sheet declaration that will point to our XSL file, just like we did for the CSS example. Simply open the XML document and insert the following line before the opening <letter> element:
Example 2.10. letter-text.xml (excerpt)
<?xml-stylesheet type="text/xsl" href="letter2text.xsl"
version="1.0"?>letter-text.xml
<?xml version="1.0"?>
 <?xml-stylesheet type="text/xsl" href="letter2text.xsl"
    version="1.0"?>
 <letter>
  <to>Mom</to>
  <from>Tom</from>
  <message>Happy Mother's Day</message>
</letter>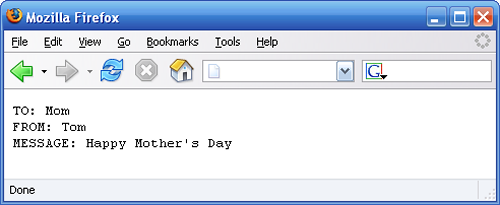 If you’re curious, go ahead and view the source of this document. You’ll notice that you won’t see the output of the transformation (technically referred to as the result tree), but you can see the XML document source.
Transforming XML into HTML
That wasn’t so bad, was it? You successfully transformed a simple XML document into flat ASCII text, and even added a few extra tidbits to the output. Now, it’s time to make things a little more complex. Let’s transform the XML document into HTML. Here’s the great part – you won’t have to touch the original XML document (aside from pointing it at a new style sheet, that is). All you’ll need to do is create a new XSL file: Example 2.12.letter2html.xsl
<xsl:stylesheet version="1.0"
    xmlns:xsl="https://www.w3.org/1999/XSL/Transform">
  <xsl:output method="html"/>
  <xsl:template match="/letter">
    <html>
      <head><title>Letter</title></head>
      <body><xsl:apply-templates/></body>
    </html>
  </xsl:template>
  <xsl:template match="to">
    <b>TO: </b><xsl:apply-templates/><br/>
  </xsl:template>
  <xsl:template match="from">
    <b>FROM: </b><xsl:apply-templates/><br/>
  </xsl:template>
  <xsl:template match="message">
    <b>MESSAGE: </b><xsl:apply-templates/><br/>
  </xsl:template>
</xsl:stylesheet>html. Additionally, our first template now outputs the basic tags to produce the framework of an HTML document, and doesn’t bother suppressing the whitespace in the source document with a select attribute.
Other than that, these instructions don’t differ much from our text-only style sheet. In fact, the only other changes we’ve made have been to tag the label for each line to be bold, and end each line with an HTML line break (<br/>). We no longer need the <xsl:text> tags, since our HTML <b> and <br/> tags perform the same function. Note the space following each label, which is inside the <b> tag so that it won’t be ignored by the processor.
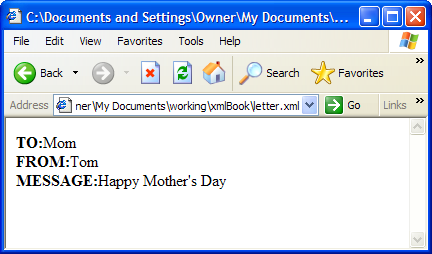
All we have to do now is edit our XML file to make sure that the <?xml-stylesheet?> instruction references our new style sheet (letter-html.xml in the code archive), and we’re ready to display the results in a Web browser.
You should see something similar to Figure 2.3, “Viewing XSL Results in Internet Explorer.”.
Figure 2.3. Viewing XSL Results in Internet Explorer.
 Using XSLT to Transform XML into other XML
What happens if you need to transform your own XML document into an XML document that meets the needs of another organization or person? For instance, what if our letter document, which uses
Using XSLT to Transform XML into other XML
What happens if you need to transform your own XML document into an XML document that meets the needs of another organization or person? For instance, what if our letter document, which uses <to>, <from>, and <message> tags inside a <letter> tag, needed to have different names, say <recipient>, <sender>, and <body>?
Not to worry – XSLT will save the day! And, as with the two previous examples, we don’t even need to worry about changing the source XML document. All we have to do is create a new XSL file, and we’re set.
As before, we’ll open with the standard stylesheet element, but, this time, we’ll choose xml as our output method. We’re also going to instruct XSLT to indent the resulting XML:
Example 2.13. letter2xml.xsl (excerpt)
<xsl:stylesheet version="1.0"
    xmlns:xsl="https://www.w3.org/1999/XSL/Transform">
<xsl:output method="xml" indent="yes"/><template> elements are structured as before, but this time they output the new XML elements:
Example 2.14. letter2xml.xsl (excerpt)
<xsl:template match="/letter">
<letter><xsl:apply-templates/></letter>
</xsl:template>
<xsl:template match=”to”>
<recipient><xsl:apply-templates/></recipient>
</xsl:template>
<xsl:template match=”from”>
<sender><xsl:apply-templates/></sender>
</xsl:template>
<xsl:template match=”message”>
<body><xsl:apply-templates/></body>
</xsl:template>
</xsl:stylesheet>
Now, all you have to do is edit your XML document to point to the style sheet, and you’ll be able to view your new XML in any Web browser, right? Wrong! You see, Web browsers only supply collapsible tree formatting for XML documents without style sheets. XML documents that result from a style sheet transformation are displayed without any styling at all, or at best are treated as HTML – not at all the desired result.
Where the browser can be useful for viewing XML output is when that XML is an XHTML document – which browsers obviously can display. There are several things that need to be added to your style sheet to signal to the browser that the document is more than a plain XML file, though. The first is the XHTML namespace:
Example 2.15. letter2xhtml.xsl (excerpt)
<xsl:stylesheet version="1.0"
    xmlns:xsl="https://www.w3.org/1999/XSL/Transform"
xmlns="https://www.w3.org/1999/xhtml"><html> and <b> will be correctly identified as XHTML tags.
Next up, we can flesh out the output element to more fully describe the output document type:
Example 2.16. letter2xhtml.xsl (excerpt)
<xsl:output method="xml" indent="yes" omit-xml-declaration="yes"
media-type=”application/xhtml+xml” encoding=”iso-8859-1″
doctype-public=”-//W3C//DTD XHTML 1.0 Transitional//EN”
doctype-system=
“https://www.w3.org/TR/xhtml1/DTD/xhtml1-transitional.dtd”/>
In addition to the method and indent attributes, we have specified a number of new attributes here:
omit-xml-declaration
This tells the processor not to add a <?xml?> declaration to the top of the output document. Internet Explorer for Windows displays XHTML documents in Quirks Mode when this declaration is present, so by omitting it we can ensure that this browser will display it in the more desirable Standards Compliance mode.
media-type
Though not required by current browsers, setting this attribute to application/xhtml+xml offers another way for the browser to identify the output as an XHTML document, rather than plain XML.
encoding
Sets the character encoding of the output document, controlling which characters are escaped as character references (&xnn;).
doctype-public, doctype-system
Together, these two attributes provide the values needed to generate the DOCTYPE declaration for the output document. In this example, we’ve specified values for an XHTML 1.0 Transitional document, but you could also specify an XHTML 1.0 Strict document if that’s what you need:
<xsl:output method="xml" indent="yes" omit-xml-declaration="yes"
media-type="application/xhtml+xml" encoding="iso-8859-1"
doctype-public="-//W3C//DTD XHTML 1.0 Strict//EN"
doctype-system=
"https://www.w3.org/TR/xhtml1/DTD/xhtml1-strict.dtd"/>
The rest of the style sheet is as it was for the HTML output example we saw above. Here’s the complete style sheet so you don’t have to go searching:
Example 2.17. letter2xhtml.xsl
<xsl:stylesheet version="1.0"
    xmlns:xsl="https://www.w3.org/1999/XSL/Transform"
    xmlns="https://www.w3.org/1999/xhtml">

  <xsl:output method="xml" indent="yes" omit-xml-declaration="yes"
      media-type="application/xhtml+xml" encoding="iso-8859-1"
      doctype-public="-//W3C//DTD XHTML 1.0 Transitional//EN"
      doctype-system=
      "https://www.w3.org/TR/xhtml1/DTD/xhtml1-transitional.dtd"/>

  <xsl:template match="/letter">
    <html>
      <head><title>Letter</title></head>
      <body><xsl:apply-templates/></body>
    </html>
  </xsl:template>

  <xsl:template match="to">
    <b>TO: </b><xsl:apply-templates/><br/>
  </xsl:template>

  <xsl:template match="from">
    <b>FROM: </b><xsl:apply-templates/><br/>
  </xsl:template>

  <xsl:template match="message">
    <b>MESSAGE: </b><xsl:apply-templates/><br/>
  </xsl:template>
</xsl:stylesheet><?xml-stylesheet?> processing instruction in your XML document at this style sheet and then load it in Firefox or Internet Explorer. You should see the output displayed as an XHTML document.
So yes, if the XML you are generating happens to be XHTML, a browser can display it just fine. Otherwise, what we need to display XML output is some kind of standalone XSLT processor that we can run instead of a Web browser.
DTDs
So far, we’ve created some very simple XML documents and learned what they’re made of. We’ve also walked through some very simple examples in which we’ve transformed XML into something else, be it text, HTML, or different XML. Now, it’s time to learn how to make your XML documents consistent.Consistency in XML
Ralph Waldo Emerson, the great American thinker and essayist, once said, “A foolish consistency is the hobgoblin of little minds.” Well, foolish or not, in the world of XML, we like consistency. In fact, in many contexts, consistency can be a very beautiful thing. However, there will come a time when you need your XML document to follow some rules – to pass a validity test – and those times will require that your XML data be consistently formatted. For example, our CMS should not allow a piece of data that’s supposed to be in the admin information file to show up in a content file. What we need is a way to enforce that kind of rule. In XML, there are two ways to set up consistency rules: DTDs and XML Schema. A DTD (document type definition) is a tried and true (if not old-fashioned) way of achieving consistency. It has a peculiar, non-XML syntax that many XML newcomers find rather limiting, but which evokes a comfortable, hometown charm among the old-school XML programmers. XML Schema is newer, faster, better, and so on; it does a lot more, and is written like any other XML document, but many find it just as esoteric as DTDs. Information on DTDs and XML Schema could fill thick volumes if we gave it a chance. Each of these technologies contains lots of hidden nooks and crannies crammed with rules, exceptions, notations, and side stories. But, remember why we’re here: we must learn as much as we need to know, then apply that knowledge as we build an XML-powered Website.Fun with Terminology
Speaking of side stories, did you know that DTD actually stands for two things? It stands not just for document type definition, but also document type declaration. The declaration consists of the lines of code that make up the definition. Since the distinction is a tenuous one, we’ll just call them both “DTD” and move on! This section will focus on DTDs, as you’re still a beginner, and providing information on XML Schema would be overkill. However, I will take a few minutes to explain XML Schema at a high level, and provide some comparisons with DTDs. Just a warning before we start: consistency in XML is probably the hardest aspect we’ve covered so far, because DTDs can be pretty esoteric things. However, I think you’ll find it worth your while, since using a DTD will prevent many problems down the road.What’s the Big Deal About Consistency?
Okay, before we get started, let’s ask a very obvious question: “Why, oh why, are we sitting here on a lovely Saturday afternoon talking about the importance of consistency in XML documents? Why aren’t we out in the park with our loyal dog Rover, a picnic basket, and our wonderful significant other?” Well, you’ve actually asked two questions there. I can’t answer the second one, because I really don’t want to get into your personal life right now. As for the first question, many possible answers spring to mind:- There will be a pop quiz later, so you’d better know your stuff.
- Your boss told you to learn it.
- You need to share your XML document with another company/department/organization, and they expect your information in a certain format.
- Your application requires that the XML documents given to it pass certain tests.
DTDs
The way DTDs work is relatively simple. If you supply a DTD along with your XML file, then the XML parser will compare the content of the document with the rules that are set out in the DTD. If the document doesn’t conform to the rules specified by the DTD, the parser raises an error and indicates where the processing failed. DTDs are such strange creatures that the best way to describe them is to just jump right in and start writing them, so that’s exactly what we’re going to do. A DTD might look something like this:<!DOCTYPE letter [
ELEMENT letter (to,from,message)
ELEMENT to (#PCDATA)
 ELEMENT from (#PCDATA)
 ELEMENT message (#PCDATA)
]><!DOCTYPE, indicates that our document type is letter. Any document we create on the basis of this DTD must therefore have a letter as its root element, or the document won’t be valid.
The rest of the DTD is devoted to explaining two things:
- The proper order of elements in the XML document.
- The proper content of elements in the XML document.
ELEMENT letter (to,from,message)- Plain text
- A single child element
- A sequence of elements
letter element to contain, in order, the elements to, from, and message. As you can see, the sequence of child elements is comma-delimited.
In fact, to be more precise, the sequence not only specifies the order in which the elements should appear, but also, how many of each element should appear. In this case, the element declaration specifies that one of each element must appear in the sequence. If our file contained two from elements, for example, it would be as invalid as if it listed the message element before to.
Naturally, there will come a time when you’ll need to specify more than just one of each element. How will you do that? With a neat little system of notation, defined in Table 3.1, “XML Element Declaration Notation”, which may remind you of UNIX regular expressions.
Table 3.1. XML Element Declaration Notation
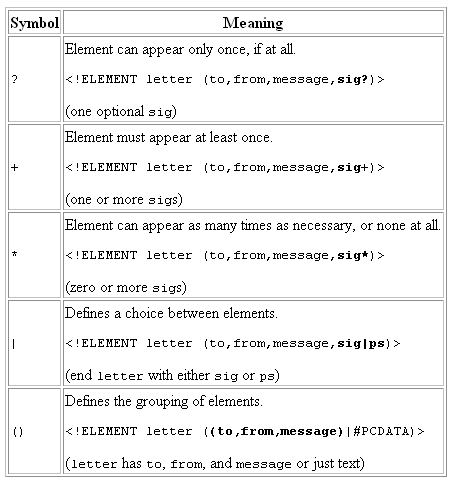 With this notation as a backdrop, you can get pretty creative:
- Require at least two instances of an element.< code>ELEMENT chapter (title,para,para+)(at least two paras)
- Apply element count modifiers to element groups.
ELEMENT chapter ((title,para+)+)(one or moretitles, each followed by one or moreparas) - Allow an element to contain an element or plain text.
ELEMENT title (subtitle|#PCDATA)(titlecontains asubtitleor plain text) - Require exactly three instances of an element.
ELEMENT instruction (step,step,step)(exactly threesteps)
letter declaration, we see these three declarations:
ELEMENT to (#PCDATA)
ELEMENT from (#PCDATA)
ELEMENT message (#PCDATA)#PCDATA used to define the contents of our elements. #PCDATA stands for parsed character data, and refers to anything other than XML elements. So whenever you see this notation in a DTD, you know that the element must contain only text.
Mixed Content
What if you want to have something like this in your XML document?
<paragraph>This is a paragraph in which items are <b>bolded</b>,
  <i>italicized</i>, and even <u>underlined</u>. Some items are
  even deemed <highpriority>high priority</highpriority>.
</paragraph>#PCDATA and other elements, like this:
ELEMENT paragraph (#PCDATA,b,i,u,highpriority) <!-- wrong! -->| symbol and add a * at the end of the element declaration:
ELEMENT paragraph (#PCDATA|b|i|u|highpriority)* <!-- right! -->paragraph element to contain any combination of plain text and b, i, u, and highpriority elements. Note that with mixed content like this, you have no control over the number or order of the elements that are used.
Empty Elements
What about elements such as the hr and br, which in HTML contain no content at all? These are called empty elements, and are declared in a DTD as follows:
ELEMENT hr EMPTY
ELEMENT br EMPTY!ATTLIST instead of |!ELEMENT. Also, we must include in the declaration the name of the element that contains the attribute(s), followed by a list of the attributes and their possible values.
For example, let’s say we had an XML element that contained a number of attributes:
<actor actorid="HF1234" gender="male" type="superstar">
Harrison Ford</actor>ELEMENT actor (#PCDATA)
ATTLIST actor
actorid ID #REQUIRED
gender (male|female) #REQUIRED
type CDATA #IMPLIEDtype – it contains CDATA, or character data. Basically, this attribute can contain any string of characters or numbers. Acceptable values for this attribute might be “superstar”, “leading man”, or even “dinosaur.” As developers, we can’t exert much control over what is placed in an attribute of type CDATA.
Do you see #IMPLIED right after CDATA? In DTD-speak, this means that the attribute is optional. Don’t ask why they didn’t use #OPTIONAL – this legacy has been passed down from the days of SGML, XML’s more complex predecessor.
Let’s take a look at the gender attribute’s definition. This attribute is #REQUIRED, so a value for it has to be supplied with every actor element. Instead of allowing any arbitrary text, however, the DTD limits the values to either male or female.
If, in our document, an actor element fails to contain a gender attribute, or contains a gender attribute with values other than male or female, then our document would be deemed invalid.
Let’s look at the most complex attribute value in our example, then we’ll stop talking about attribute and element declarations. The actorid attribute has been designated an ID. In DTD-speak, an ID attribute must contain a unique value, which is handy for product codes, database keys, and other identifying factors.
In our example, we want the actorid attribute to uniquely identify each actor in the list. The ID type set for the actorid attribute ensures that our XML document is valid if and only if a unique actorid is assigned to each actor.
Some other rules that you need to follow for IDs include:
- ID values must start with a letter or underscore.
- There can only be one ID attribute assigned to an element.
IDREF attribute type. We won’t have any use for this attribute type in this book, however.
Entity Declarations
An entity is a piece of XML code that can be used (and reused) in a document with an entity reference. For example, the entity reference < is used to represent the < character, an XML built-in entity.
XML supports a number of built-in entities (among them <, >, "e; and &) that don’t ever need to be declared inside a DTD. With entity declarations, you can define your own entities – something that I think you’ll find very useful in your XML career.
There are different types of entities, including general, parameter, and external. Let’s go over each very quickly.
General entities are basically used as substitutes for commonly-used segments of XML code. For example, here is an entity declaration that holds the copyright information for a company:
ENTITY copyright "© 2004 by Triple Dog Dare Media"<footer>©right;</footer>©right;, an entity reference, it looks for its entity declaration and substitutes the text we’ve declared as the entity.
There are a couple of restrictions on entity declarations:
- Circular references are not allowed. The following is a no-no:
ENTITY entity1 "&entity2; is a real pain to deal with!" ENTITY entity2 "Or so &entity1; would like you to believe!" - We can’t reference a general entity anywhere but in the XML document proper. For entities that you can use in a DTD, you need parameter entities.
% sign. Here’s an example of a parameter entity, and its use in a DTD:
ENTITY % acceptable "(#PCDATA|b|i|u|citation|dialog)*"
 ELEMENT paragraph %acceptable;
 ELEMENT intro %acceptable;
 ELEMENT sidebar %acceptable;
ELEMENT note %acceptable;paragraph, intro, sidebar, and note can contain regular text as well as b, i,u, citation, and dialog elements. Not only does the use of a parameter entity reduce typing, it also simplifies maintenance of the DTD. If, in the future, you wanted to add another element (sidebar) as an acceptable child of those elements, you’d only have to update the %acceptable; entity:
ENTITY % acceptable "(#PCDATA|b|i|u|citation|dialog|sidebar)"ENTITY favquotes SYSTEM "http://www.example.com/favstocks.xml"SYSTEM keyword to indicate that the entity is really a file that resides on a server. You’d use the entity in your XML documents as follows:
<section>
  <heading>Current Favorite Stock Picks</heading>
  &favquotes;
</section>.dtd – for example, letter.dtd. This external DTD contains the same notational rules set forth for an internal DTD.
To reference this external DTD, you need to add two things to your XML document. First, you must edit the XML declaration to include the attribute
standalone="no":
<?xml version="1.0" standalone="no"?>DOCTYPE declaration that points to the external DTD, like this:
<!DOCTYPE letter SYSTEM "letter.dtd">letter.dtd file in the same directory as the XML file. If the DTD lives on a Web server, you might point to that instead:
<!DOCTYPE letter SYSTEM
    "http://www.example.com/xml/dtd/letter.dtd">
A 10,000-Foot View of XML Schema
The XML Schema standard fulfills the same requirements as DTDs: it allows you to control the structure and content of an XML document. But, if it serves the same purpose as DTDs, why would we use XML Schema? Well, DTDs have a few disadvantages:- DTD notation has little to do with XML syntax, and therefore cannot be parsed or validated the way an XML document can.
- All DTD declarations are global, so you can’t define two different elements with the same name, even if they appear in different contexts.
- DTDs cannot strictly control the type of information a given element or attribute can contain.
Frequently Asked Questions (FAQs) about XML
What is the difference between XML and HTML?
XML and HTML are both markup languages, but they serve different purposes. HTML is used to display data and focuses on how data looks. It has predefined tags that are used to format and display information on a web page. On the other hand, XML is used to store and transport data. It doesn’t do anything on its own, but provides a way to structure data so that it can be read by different types of applications. XML tags are not predefined; you must define your own tags.
How is XML used in web services?
XML is widely used in web services, which are applications that can be published and called over the Internet by client applications. XML provides a way to encode data in a format that can be read by these client applications, regardless of how the application was created or what platform it runs on. This makes it a key technology for enabling interoperability between disparate systems.
What are XML namespaces?
XML namespaces are a mechanism for avoiding name conflicts in XML documents. They work similarly to the file directories on your computer, allowing you to distinguish between elements and attributes that have the same name but belong to different libraries. An XML namespace is declared using the xmlns attribute in the start tag of an element.
What is the purpose of an XML schema?
An XML schema is a description of the structure of an XML document. It defines the elements and attributes that can appear in a document, the types of data that can be stored in elements and attributes, and the order in which elements can appear. XML schemas are used to validate XML documents, ensuring that they meet the requirements specified in the schema.
How does XML handle data types?
Unlike HTML, XML supports data types. This means that you can specify the type of data that an element or attribute can contain, such as integer, string, date, etc. This is done using an XML schema. When an XML document is validated against a schema, the validator checks that the data in the document matches the data types specified in the schema.
What is an XML parser?
An XML parser is a software library or package that provides interfaces for client applications to work with XML documents. It reads XML documents and provides an interface for programs to access their content and structure. Parsers check for well-formedness: whether the XML document follows the basic syntax rules of XML.
What is the difference between a well-formed and a valid XML document?
A well-formed XML document follows the basic syntax rules of XML. For example, it must have one and only one root element, start and end tags must match, tags must be properly nested, etc. A valid XML document, on the other hand, is a well-formed XML document that also conforms to the rules of a specified XML schema.
What is XSLT in XML?
XSLT stands for XSL Transformations. It is a language for transforming XML documents into other formats such as HTML, PDF, or other XML documents. An XSLT processor reads the XML document and the XSLT stylesheet, and produces an output document in the format specified by the stylesheet.
How is XML used in databases?
XML is used in databases to store and transport data. XML provides a flexible way to represent complex data structures, making it a good choice for storing data that doesn’t fit neatly into a table. Many databases support XML as a data type, allowing you to store XML documents in database columns.
What is the future of XML?
XML continues to be a key technology for data interchange, particularly in enterprise and B2B contexts. While newer technologies like JSON have become popular for web APIs, XML is still widely used in many industries. Its future is likely to be as a specialized tool for certain types of data interchange, rather than as a general-purpose markup language.
 Tom Myer
Tom is the founder of Triple Dog Dare Media, an Austin, TX-based professional services consultancy that specializes in designing, building, and deploying ecommerce, database, and XML systems. He's spent the last 7 years working in various areas of XML development, including XML document analysis, DTD creation and validation, XML-based taxonomies, and XML-powered content and knowledge management systems.