The MVC pattern is a laudable ideal, but those who have implemented it on more than one site have probably felt like they were reinventing the wheel in several areas. The open-source Apache Struts framework lets you get on with the job of building your site, as it provides the best mag wheels in town.
In this article, we’ll take a brief trip into the world of the Model-View-Controller (MVC) design pattern, and, in particular, we’ll look at how it is implemented using the Struts framework. We will start by describing the MVC pattern at a theoretical level, then move on to describe how we might ‘roll-our-own’ MVC framework. Once we’ve looked at this, we’ll describe Struts and show how this technology helps us quickly and simply build MVC-based Web applications.
The Model-View-Controller Pattern
The MVC pattern was first conceived in the Smalltalk world. We’ll bypass this history for now, and instead concentrate on how it’s applied in the realm of Java Web application development.
When Java Servlets were first conceived, programmers instantly recognised them as a great technology. They were faster, more flexible, more reliable, and more powerful than the existing CGI method of Web programming. However, there was one big flaw with developing Servlet based Web applications — the constant need for out.println("...") type statements to output HTML to the user’s browser. This method was error prone, and extremely time consuming (developers have to escape any quotes etc. that are sent to the browser). It also made it very difficult to modify the presentation of a Website, as the presentation and logic were all bundled up together in one horrible mess.
The answer to this was JavaServer Pages, which turned Servlets on their head. With this, we wrote our business logic code in among our HTML using a series of <%...%> tags. This made our applications JSP-centric, which, despite not being quite as bad as their Servlet-centric counterparts, was still messy and necessitated a lot of extra code to control the flow of the application. Really, this had no place among the formatting code in a JSP. Cleary it was time to find another way.
It was soon realised that JavaServer Pages and Servlets could work very well together. After all, Servlets are very good at logic-type programming, processing requests, and dealing with flow of control, while JavaServer Pages are very good at formatting the results of request processing, and collecting user input via the browser. This way of working soon became known as Model 2 (using JavaServer Pages or Servlets alone is known as Model 1).
Model 2 was not particularly innovative or new; many people soon realised that it follows the well-known MVC pattern that was developed back in the days of Smalltalk. As such, Java programmers tend to use the terms Model 2 and MVC interchangeably.
What is Model-View-Controller?
Now that we know a little about the history of MVC in the development of Java Web applications, it seems sensible to describe the pattern itself in more detail. In this section, we’ll find out exactly what Models, Views, and Controllers actually are, what their responsibilities are, and how we might implement a simple framework ourselves. Let’s start by looking at how the Model, the View, and the Controller interact with one another:
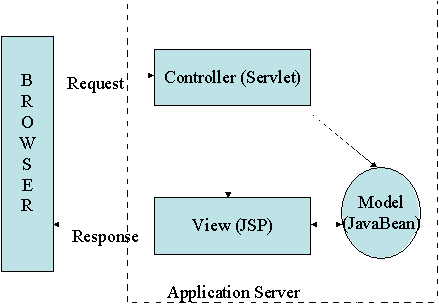
Figure 1 : Model 2/MVC architecture
As you can see from the above diagram, the user interacts with the Controller components (usually represented by Servlets) by submitting requests to them. In turn, the Controller components instantiate Model components (usually represented by JavaBeans or other similar technology), and manipulate them according to the logic of the application. Once the Model is constructed, the Controller decides which View (usually represented by JavaServer Pages) to show to the user next, and this View interacts with the Model to show the relevant data to the user. The View can also modify the state of the Model before it is submitted to the Controller for the process to start again.
In order to more fully understand the interactions between the components, it is useful to consider a simple example of such a framework. This example will look at a simple application that submits and records users’ login information. Don’t forget to download the code for this article here.
The View
For the view of this application we will use 2 simple JSPs. These are shown below:
<html>
<head>
<title>Please Login</title>
</head>
<body>
<h1>Please enter your login information</h1>
<br/>
<form action="controller?action=login" method="post">
<table border="0">
<tr>
<td>Username</td>
<td><input type="text" name="username"/></td>
</tr>
<tr>
<td>Password</td>
<td><input type="password" name="password"/></td>
</tr>
<tr>
<td>
<input type="submit"/>
</td>
<td>
</td>
</tr>
</table>
</form>
</body>
</html>
The login.jsp pageThis login page simply gives the user the opportunity to enter their username and password. This submits its input to the controller Servlet (shown below), telling it to invoke the login action (this is the action parameter sent by the form):
<jsp:useBean id="user" class="com.samjdalton.mvc.model.UserBean" scope="session" />
<html>
<head>
<title>Welcome</title>
</head>
<body>
<h1>Welcome <jsp:getProperty name="user" property="name"/></h1>
</body>
</html>
The welcome.jsp pageThe welcome.jsp page displays a welcome message to the user using the username they provided on the previous page. As you can see, this simply uses a JavaBean that is in the session (as shown by the
useBeantag.) This bean is placed in the session by the Controller, as we'll see next.The Controller
A Servlet, the code for which is shown below, implements the Controller in our application:
package com.samjdalton.mvc.controller;
import com.samjdalton.mvc.controller.actions.LoginAction;
import javax.servlet.http.HttpServlet;
import javax.servlet.http.HttpServletRequest;
import javax.servlet.http.HttpServletResponse;
import javax.servlet.ServletException;
import javax.servlet.RequestDispatcher;
import java.io.IOException;
public class Controller extends HttpServlet {
protected void doGet(HttpServletRequest httpServletRequest, HttpServletResponse httpServletResponse) throws ServletException, IOException {
doPost(httpServletRequest, httpServletResponse);
}
protected void doPost(HttpServletRequest httpServletRequest, HttpServletResponse httpServletResponse) throws ServletException, IOException {
// get the action property from the request
String theAction = httpServletRequest.getParameter("action");
Action action=null;
if (theAction.equalsIgnoreCase("login")) {
action = new LoginAction(httpServletRequest,httpServletResponse);
}
// execute the action, which returns the page to go to next
String page = action.execute(httpServletRequest,httpServletResponse);
RequestDispatcher rd = httpServletRequest.getRequestDispatcher(page);
// forward to the next page
rd.forward(httpServletRequest,httpServletResponse);
}
}
Controller.classThis is a very simple controller that merely uses a request parameter (action) to decide which action to invoke. In this case, the page sends the login action as the parameter, and the
LoginActionis invoked. This action implements a standard interface (Action) with one method, execute, that takes theRequestandResponseobjects as its parameters. The action class returns the path of the next page (view) to invoke, and the user is redirected to this page.The
LoginActionin our example is shown below:
package com.samjdalton.mvc.controller.actions;
import com.samjdalton.mvc.controller.Action;
import com.samjdalton.mvc.model.UserBean;
import javax.servlet.http.HttpServletRequest;
import javax.servlet.http.HttpServletResponse;
public class LoginAction implements Action {
public LoginAction(HttpServletRequest request, HttpServletResponse response) {
}
public String execute(HttpServletRequest req, HttpServletResponse res) {
// get the user name
String username = req.getParameter("username");
// create a UserBean
UserBean user = new UserBean(username);
// put it in the session
req.getSession().setAttribute("user", user);
// redirect to the welcome.jsp page
return "/welcome.jsp";
}
}
LoginAction classThis action obtains the username parameter from the request, creates a new model object (
UserBean), places this into theSession, and indicates that the next page in the flow is welcome.jsp.The Model
The model in our application is very simple, consisting of just one JavaBean. This is shown below:
package com.samjdalton.mvc.model;
public class UserBean {
private String name;
public UserBean(){}
public UserBean(String name) {
this.setName(name);
}
public void setName(String name) {
this.name=name;
}
public String getName() {
return name;
}
}
UserBean.classApplication in Action
As you can see, this is a very simple Model 2 application that could be greatly extended. For example, we could configure the actions dynamically; we could also externalize the flow of control (the actions could ask a configuration manager which page to go to next).
However, there is a pre-existing framework that provides all of this configurability and much more. That framework is called Struts.
Introduction to Struts
The Struts project was conceived by Craig McClanahan in early 2000 to provide a standard method for developing MVC-based Java Web applications. Struts 1.0 was finally released in the middle of 2001, and is now part of the Jakarta project from the Apache Foundation. Struts is in wide scale use in a variety of different projects, across arrange of industries (I personally have used it in various projects from banking to shipping!).
Struts is a highly configurable, highly extensible MVC framework that we can use to develop almost any Java Web application imaginable. Each member of the MVC framework is provided for within Struts. Let's turn our thoughts to the task of installing Struts.
Installing Struts
You can obtain the latest Struts distribution (at the time of writing, this is 1.1) at (Broken Link). Once you've downloaded it, you should unzip the application. The distribution contains all the libraries required to develop a Struts application. The distribution contains a blank Struts Web application (struts-blank.war) within the Webapps directory. This is particularly useful as it contains a skeleton Web application that you can build upon to create your own applications.
You can put your own code within the WEB-INF/classes directory, your own configuration within the WEB-INF/struts-config.xml, and with that, you're away! You have a fully functional Struts application. You can create a war file and simply deploy this in your favourite Web container (for example, copy it to the webapps directory for Tomcat).
Next, we'll look at the components provided by Struts.
The View Layer
The view layer of most Struts applications is made up of JavaServer pages. To facilitate the development of the view, Struts provides a set of JSP custom tag libraries. These tag libraries allow us to easily provide fully internationalised user interfaces that interact with the model components of a Struts application.
The vast majority of dynamic Web front ends are based on HTML forms, and users of such applications have come to expect from these applications certain behaviours, such as form validation. With standard JSP, this is a tedious process that involves recording the contents of the form and populating every form element with information from a JavaBean in case of error. Struts facilitates this sort of form processing and validation using FormBeans. These, in combination with the Struts tag libraries, make View development with forms really simple and natural.
Below is an example of a Struts JSP view:
<%@ taglib uri="/WEB-INF/struts-html.tld" prefix="html" %>
<html:html>
<head></head>
<body bgcolor="white">
<html:errors/>
<html:form action="/logon">
<table border="0" width="100%">
<tr>
<td>
Username:
</td>
<td>
<html:text property="username"/>
</td>
</tr>
<tr>
<td>
Password:
</td>
<td>
<html:password property="password"/>
</td>
</tr>
<tr>
<td>
<html:submit/>
</td>
<td>
</td>
</tr>
</table>
</html:form>
</body>
</html:html>As you can see, this does not look dissimilar to a standard HTML form. There are no nasty JSP scriptlets within the page, yet we have some pretty rich functionality. The page imports the Struts HTML tag library that allows us to assemble forms that provide validation, error handling, and model interaction. We also see the use of the <html:errors> tag, which displays any errors that the model or controller has registered. The <html:form> tag creates an HTML form based on an ActionForm object. As we can see, the form’s action is set to /logon; this value is used by the tag to look up the ActionForm to use in the configuration file (see below). This mapping consists of the name associated with the form object, and the scope in which it is stored (session, page, application, etc.). The properties of the object are then used by the <html:text> and <html:password> tags to populate the form. The ActionForm is also automatically populated with the form values when it is submitted.
It might seem as though ActionForms represent the Model of our application, but, in actual fact, they should be considered part of the controller part of the application. Although ActionForm beans can represent the properties of our model, they contain no persistence logic, nor any business logic. ActionForms are used to pass Model information between the Model and the View.
As ActionForms represent part of the controller part of our application, let’s now look at building ActionForms in the controller section.
The Model Layer
Having looked at the view layer of a Struts application, we can now consider the Model layer.
The model layer in a Struts application can be implemented using any Java-based technology, such as EJB, Hibernate, or JDO. Often, the model is represented as simple JavaBeans containing the data and business logic. As discussed, ActionForm objects do not represent the true model of the application, and our Model layer should not directly represent HTML form objects. As far as possible, the model objects should be developed so that they have no knowledge of the environment (Struts or otherwise) that they’re being used within. This allows us to more easily reuse them across environments and applications.
For the purposes of this article, we’ll develop a simple JavaBean-based model layer that contains no persistence mechanism. As this will map to our ActionForm object, we could simply replace it with a more complex technology in the future.
The Controller Layer
Now that we understand how to build the Model and View pieces of a Struts application, we can move on to look at the Controller. Struts includes a Servlet that implements the primary functions of the Controller, which is to map the incoming URL to an action object. This Servlet is known as the ActionServlet, and provides the following functions:
- Decide what action is required to service a users request
- Provide view data to the view
- Decide which view to show next
Most of the controller’s work is delegated to a set of simple Action classes. A Struts developer must provide these actions to implement the logic of their application. In order to create an Action, the developer must implement the Action interface. This interface contains the following method, in which the bulk of the logic is placed:
public ActionForward execute(ActionMapping mapping,
ActionForm form,
HttpServletRequest request,
HttpServletResponse response)
throws Exception;
As you can see, the method takes anActionFormas one of its parameters. TheActionServletensures that the correct form is passed to the method. As discussed earlier,ActionFormshelp us to transfer data from the Model layer to the View layer.
ActionFormsare very simple objects; the code below represents theActionFormthat we would use for a simple HTML form:
import javax.servlet.http.HttpServletRequest;

import javax.servlet.http.HttpServletResponse;

import org.apache.struts.action.ActionForm;

import org.apache.struts.action.ActionMapping;


public class Login extends ActionForm {


    protected String username;

    protected String password;


    public void setUsername(String username) {

        this.username = username;

    }


    public String getUsername() {

        return username;

    }


    public void setPassword(String password) {

        this.password=password;

    }


    public String getPassword() {

        return password;

    }


}
The action also takes an ActionMapping object. This is automatically dealt with by the ActionServlet, and represents the configuration of your application. The configuration is achieved using an XML file, usually called struts-config.xml, which the next section will discuss in detail.
The action also takes the standard request and response; your application can interrogate these to get the required information to do its job. Once the Action has done its processing, it simply asks the ActionMapping where it should go next, and returns this to the ControllerServlet.
Pulling the Layers Together
Now that we’ve looked at the layers that exist in a Struts application, we can examine how they are tied together to form a full application. As we’ve already mentioned, Struts applications are configured using an XML file, named struts-config.xml. This configuration file contains information about every configurable aspect of the application, including:
- the controller to use
- the ActionForms and the HTML forms that they map to
- the Actions
- the ActionMappings, which determine the flow of control through the application
Each element within the struts-config.xml file is contained within the <struts-config> element:
<?xml version="1.0" encoding="ISO-8859-1" ?>

    <!DOCTYPE struts-config PUBLIC

              "-//Apache Software Foundation//DTD Struts Configuration 1.2//EN"

              "http://jakarta.apache.org/struts/dtds/struts-config_1_2.dtd">

    <struts-config>
For the purposes of this article, we will not consider the configuration of the controller component, as this is largely unnecessary for most applications.
In order to configure our ActionForm objects, we’ll use the following XML configuration:
<form-beans>

  <form-bean

                name="logonForm"

                type="com.samjdalton.struts.LogonForm"/>

</form-beans>
As we can see, this declares a form called logonForm and indicates that the com.samjdalton.struts.LogonForm class implements this form.
Next, we declare our ActionMappings. This is achieved using the following XML configuration tags:
<action-mappings>


            <action

                path="/Login"

                forward="/login.jsp"/>

      <action

                path="/Welcome"

                forward="/welcome.jsp"/>


      <action

                path="/ProcessLogin"

                type="com.samjdalton.struts.LoginAction"

                name="logonForm"

                scope="request"

                validate="true"

                input="/Login.do">

                <forward

                    name="success"

                    path="/Welcome.do"/>

                <forward

                    name="failure"

                    path="/Logon.do"/>

            </action>

</action-mappings>
This declares three actions for our application. The first two (/Login and /Welcome) are very simple, in that they just forward on to a JSP page. The third is more complex. This action is called on the submission of a form. It creates the ActionForm represented by the logonForm element, and calls the LoginAction class to process the information. This element also contains 2 <forward> elements. These define the flow of control for the application. The application references these by their name (success or failure) and the control is passed to the relevant resource.
Struts in Action
Having looked at all the pieces that make up a Struts application, we can now assemble a simple application that performs the same job as the original application in this article, that is, to log a user in and display a welcome message.
First, we’ll examine our View. In this application the view is made of 2 simple JSPs, the first of which allows users to input their username and password, and is shown below:
<%@ taglib uri="/WEB-INF/struts-html.tld" prefix="html" %>
<html:html>
<head></head>
<body bgcolor="white">
<html:errors/>
<html:form action="/ProcessLogin">
<table border="0" width="100%">
<tr>
<td>
Username:
</td>
<td>
<html:text property="username"/>
</td>
</tr>
<tr>
<td>
Password:
</td>
<td>
<html:password property="password"/>
</td>
</tr>
<tr>
<td>
<html:submit/>
</td>
<td>
</td>
</tr>
</table>
</html:form>
</body>
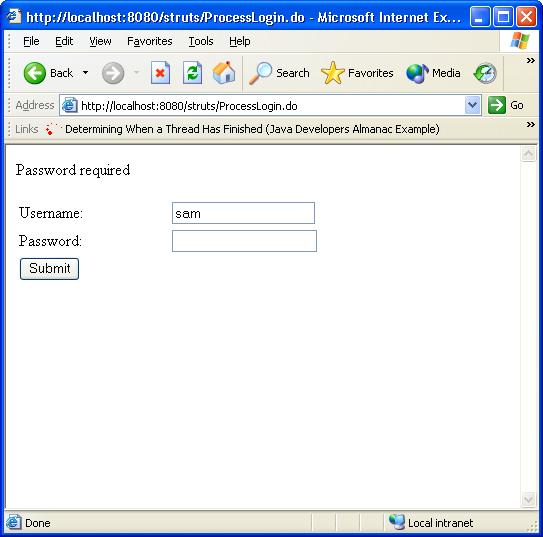
</html:html>This is very similar to the page we examined in the earlier section discussing views. It simply defines a form using the Struts <html> tags, and associates this with an Action defined in the configuration named /ProcessLogin. When the form is submitted, the appropriate ActionForm will be created and the appropriate action will be called to process the input. We can also see that the <html:errors> tag is used. This will automatically display any validation errors that are indicated by the form (see below).
The second JSP in our view is yet simpler. The code is shown below:
<%@ taglib  uri="/WEB-INF/struts-html.tld" prefix="html" %>

<%@ taglib  uri="/WEB-INF/struts-bean.tld" prefix="bean" %>


<html:html>


   <h1>Welcome <bean:write name="loginForm" property="username" /></h1>


</html:html>
This page simply displays a property (username) of an ActionForm bean named loginForm. This uses the Struts <bean> tag library.
Next, we’ll look at our Controller layer. This is implemented as an ActionForm class, and one Action class. The ActionForm class is very simple, and maps to our model (in this case, a simple JavaBean object.)
package com.samjdalton.struts;


import org.apache.struts.action.ActionForm;


public class LoginForm extends ActionForm {

    private LoginBean bean;


    public LoginForm() {

        this.bean=new LoginBean();

    }

    public LoginForm(LoginBean bean) {

        this.bean = bean;

    }


    public void setUsername(String username) {

        bean.setUsername(username);

    }


    public String getUsername() {

        return bean.getUsername();

    }


    public void setPassword(String password) {

        bean.setPassword(password);

    }


    public String getPassword() {

        return bean.getPassword();

    }


}
Our action class uses this ActionForm to get information from the view, and to update the model. The Action is shown below:
package com.samjdalton.struts;


import org.apache.struts.action.Action;

import org.apache.struts.action.ActionForward;

import org.apache.struts.action.ActionMapping;

import org.apache.struts.action.ActionForm;


public class LoginAction extends Action {


    public ActionForward execute(ActionMapping actionMapping, ActionForm actionForm, javax.servlet.http.HttpServletRequest httpServletRequest, javax.servlet.http.HttpServletResponse httpServletResponse) throws Exception {


        // check the username

        LoginForm form = (LoginForm) actionForm;

        if (form.getUsername().equalsIgnoreCase("sam") && form.getPassword().equals("password")) {

            // we are in

            return actionMapping.findForward("success");

        } else {

            // not allowed

            return actionMapping.findForward("failure");

        }

    }

public ActionErrors validate(ActionMapping actionMapping

           HttpServletRequest httpServletRequest) {

       ActionErrors errors = new ActionErrors();


        if ( getUsername() == null || getUsername().length() < 1 ) {

            errors.add("name",new ActionError("error.name.required"));

        }


        if ( getPassword() == null || getPassword().length() < 1 ) {

            errors.add("pw",new ActionError("error.pw.required"));

        }


        return errors;

}
As you can see, this action checks that the user has entered the username, sam and the password, password. If this is the case, then the Action indicates that the next view to show is represented by the ActionMapping success; otherwise the failure ActionMapping should be shown.
The ActionForm class also contains a method called validate. This method allows us to perform some basic validation on the contents of the form, and notify the user of any errors (missing fields etc). In our case, the validate method checks to see that the username and password are both filled in. If they are not, then the user is sent one or both error messages. These messages are contained in a resource file (to aid internationalisation), which is defined in the configuration file, as we’ll shortly see.
The model for our application is a standard JavaBean object with no persistence, and is shown below:
package com.samjdalton.struts;


public class LoginBean {

    private String username;

    private String password;


    public void setUsername(String username) {

        this.username=username;

    }


    public String getUsername() {

        return username;

    }


    public void setPassword(String password) {

        this.password = password;

    }


    public String getPassword() {

        return password;

    }

}
Having seen the code elements of the application, we can look at the struts-config.xml for the application:
<?xml version="1.0" encoding="ISO-8859-1" ?>

<!DOCTYPE struts-config PUBLIC

"-//Apache Software Foundation//DTD Struts Configuration 1.2//EN"

"http://jakarta.apache.org/struts/dtds/struts-config_1_2.dtd">

<struts-config>

    <form-beans>

        <form-bean

            name="loginForm"

            type="com.samjdalton.struts.LoginForm"/>

    </form-beans>


    <action-mappings>


        <action

            path="/Login"

            forward="/login.jsp"/>

        <action

            path="/Welcome"

            forward="/welcome.jsp"

            name="loginForm"

            scope="request"/>


        <action

            path="/ProcessLogin"

            type="com.samjdalton.struts.LoginAction"

            name="loginForm"

            scope="request"

            validate="true"

            input="/Login.do">

            <forward

                name="success"

                path="/Welcome.do"/>

            <forward

                name="failure"

                path="/Login.do"/>

        </action>

    </action-mappings>

    <message-resources

        parameter="ApplicationResources"

        null="false" />

</struts-config>
Most of this file is identical to the example shown earlier, the only addition is that of a <message-resources> tag. This tag allows us to externalize string type resources from the application code. This allows us very easily to internationalise our application. In the above example, the resources are contained in a file named ApplicationResources.properties, which must exist on the applications classpath (the easiest way to achieve this is to place it in the root of your WEB-INF/classes folder).
In order to deploy the application, see the Installing Struts section of this article.
Once deployed, the application can be accessed at the following URL (for Tomcat):
http://localhost:8080/<war-file-name>/Login.doBelow are some screenshots from this application:

The login page
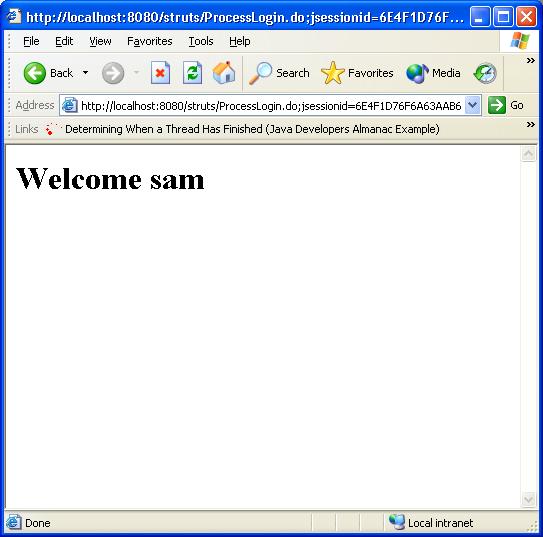
The welcome page
Validation Errors
Summary
In this article, we’ve looked at the Model-View-Controller pattern, a simple “roll your own” implementation, and Struts, which allow us to develop flexible and extensible MVC-based Web applications. Obviously, there is more to Struts than we can hope to cover in an article like this, so you should consult the resources below for more information.
References
Websites:
The Jakarta Struts site http://jakara.apache.org/struts
Books:
Jakarta Struts Pocket Reference by Chuck Cavaness, Brian Keeton. May 2003.
http://www.amazon.com/exec/obidos/ASIN/0596005199/
Programming Jakarta Struts by Chuck Cavaness. November 2002
http://www.amazon.com/exec/obidos/tg/detail/-/0596003285
Struts in Action by Ted Husted, Cedric Dumoulin, George Franciscus, and David
Winterfeldt; Foreword by Craig R. McClanahan. November 2002.
http://www.amazon.com/exec/obidos/ASIN/1930110502/
 Sam Dalton
Sam is a Java Developer and Architect based in London. He's co-authored 3 books so far (Professional Servlets and Professional SCWCD Certification from Wrox Press, and Pro JSP 2.0 from APress!). Visit him at http://www.samjdalton.com.