The Photoshop brush tool can do a whole lot more than make fuzzy-edged shapes. In this article, you’ll learn how to use the Photoshop Brushes palette to create some awesome graphic effects to use on your web sites. We’ll also cover how to expand your brush options even more by loading other people’s brushes and even making your own!
Mimicking Nature
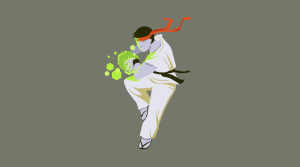
Let’s take a look at how we can use Photoshop to create a beautiful scattering of leaves. If you have yet to experiment with Photoshop brushes, you might be thinking that we’ll be creating these leaves individually — rotating them, squishing, coloring, and otherwise transforming them, until they’re perfectly and uniquely arranged.
Not so! With the power of Photoshop brushes, creating an effect similar to this can take you minutes, rather than hours!

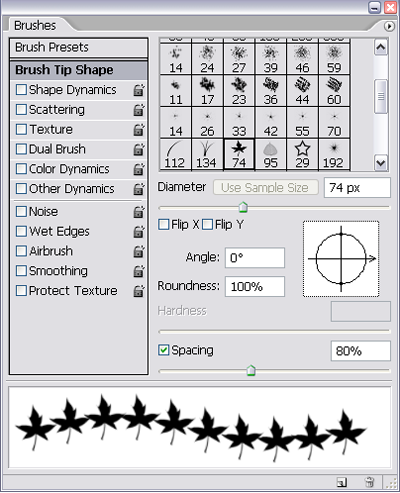
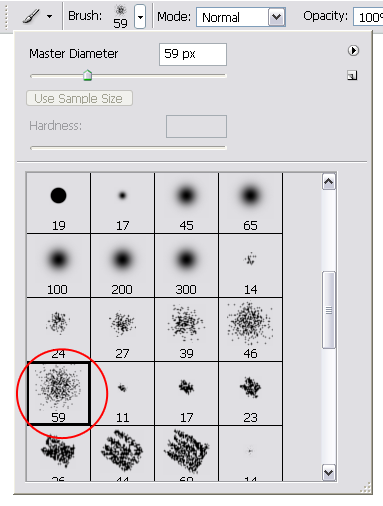
In Photoshop, select the Brush tool (B). From the Options bar, click the little arrow next to the brush to display all of the available brushes. Look for the leaf brush, circled in red below.

If you don’t see it (the leaf brush should be available in Photoshop CS2 and above), you may need to reset your brushes. The flyout box — called the Brush Preset picker — has another small arrow; click this to reveal the brush options and then choose Reset Brushes.

By itself, the brush draws a leaf shape when you click once on your image canvas. If you click and drag, however, you get a line of leaves, like the one shown below. How closely they are spaced depends on how quickly you move your mouse.

Open up the Brushes palette and start playing with the options. Here are some things you can try.
Under Brush Tip Shape, make sure the Spacing checkbox is checked, and move the slider to about 80%.
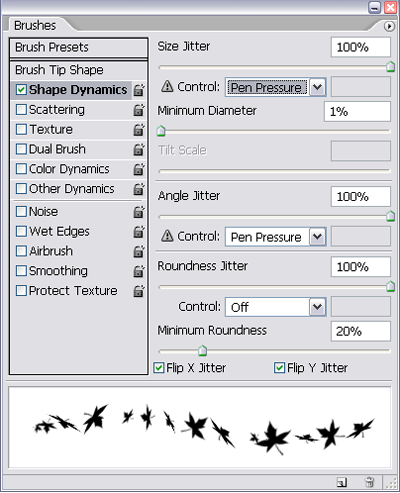
Next, click on Shape Dynamics. For all of the jitter-related settings (Size Jitter, Angle Jitter, and Roundness Jitter), drag the sliders to 100%. Also check the Flip X Jitter and Flip Y Jitter checkboxes. You can see how this might affect the brush in the preview box.
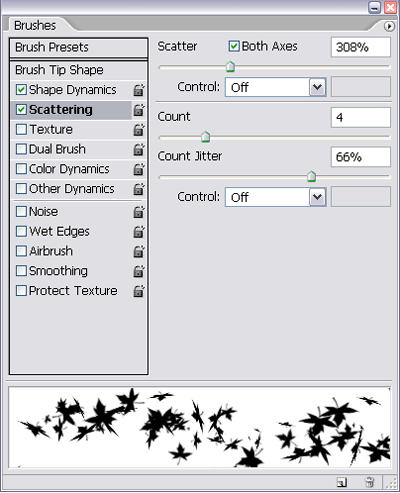
Now click on Scattering, and increase the Scatter amount, checking the Both Axes checkbox while you’re at it. This setting determines how far away from the brush stroke the leaves might end up — I’ve set mine to around 300%. If you like, you can also increase the Count, which affects how many leaves appear, and the Count Jitter, which will randomize the number of leaves.
The next set of parameters that we’ll modify affect the color dynamics of our brush. Click the Color Dynamics check box; this page allows you to control the color of the leaves and provide some variation between each shape. I’ve increased the Hue and Saturation Jitter amounts just slightly. Unfortunately, the Photoshop preview feature doesn’t show these color jitter effects, but you can always come back to this window and adjust the settings should you wish to increase or decrease the color variation.
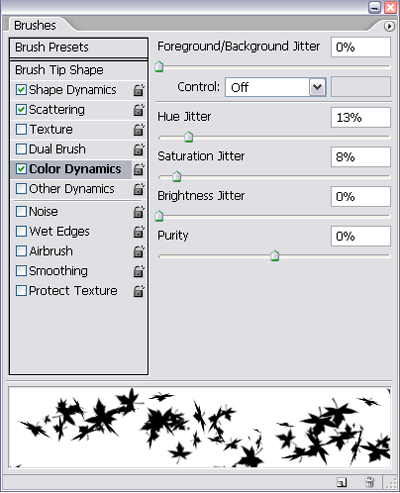
If you want, you can also try changing the Other Dynamics settings to vary the opacity and flow. For this example, I want my leaves to be solid, so I haven’t tweaked any of these settings.
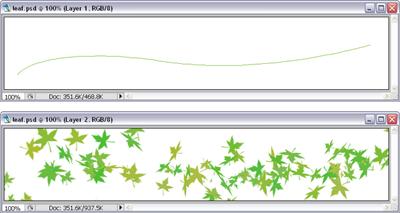
Now you’re ready to test out the brush! In the figure below, I’ve shown the rough path that I’m going to follow with the brush tool in the top window. The bottom window shows the results of following this path with our new brush:
At this point, you can go back to the Brushes palette and adjust the different settings, including the size of the brush, to try out different effects. Each time you use the brush you’ll get slightly different results, but as you play with the palette, you’ll find a combination that you like.
Photoshop comes with other built-in brushes that provide similar effects. Click on the arrow in the Brush Preset picker as if you were resetting the brush, and you’ll see a list of the other available brush libraries. Under the Assorted Brushes option, try the snowflake or star brushes. Under the list of Special Effect brushes, you’ll find some floral shapes, a butterfly shape, and even a rubber duck!

Easy Grunge
You can use the concept that we just learned for mimicking nature to easily create a successful grunge effect. In the following example, I’ll use different Photoshop brushes to create a rusty, grungy look for a web site header graphic, like the one pictured below.

Start by resetting your brush options as described in the last example. Then, select one of the spatter brushes from the Brush Preset picker.
Play with the options in the Brushes palette. Here are the exact settings that I modified:
- Brush Tip Shape
- Spacing: Increased to 14%
- Size Jitter: 100%
- Angle Jitter: 62%
- Roundness Jitter: 21%
- Flip X Jitter and Flip Y Jitter selected
- Scatter: Both axes, 274%
- Count: 2
- Count Jitter: 52%
- Opacity Jitter: 35%
Next, fill the background layer with a rusty orange color (#b26d0a) and create a new layer by clicking on the New Layer icon in the Layers palette.
Set the Foreground color to a slightly darker shade (e.g. #a26103). Using the Brush tool, paint across your image so that you cover most of the canvas. This produces a subtle textured effect like the one shown below.

Now set the Foreground color to an even darker shade (I’ve used #8b5200). Create another new layer using the Brush tool, and add a few strokes in different areas to continue to build up your grunge effect.

Continue to add different layers and colors until you’re happy with the effect!
Another thing you can try, rather than using different colors, is to change the Mode in the options bar to specify a different option, such as Multiply, Color Burn, or Color Dodge. You’ll want to lower the opacity of your brush so that the effect isn’t too overwhelming. Use the brush tool directly on your background layer; below is an example in which I’ve used the Color Dodge mode:

Here’s the result I achieved after using Color Burn, Multiply, and Screen at different opacities:
Be sure to explore the other spatter and artistic-type brushes available in Photoshop when creating your own grungy or distressed effects!
Loading Other People’s Brushes
You aren’t limited to the standard built-in Photoshop brushes. Many wonderful — and often free — brushes are available from other artists and designers. Running a web search for the term “Photoshop brushes” will yield many resources. Typically, when you download the brushes, you’ll receive an .abr file. You can move this into your Photoshop brush folder location (usually Program FilesAdobeAdobe Photoshop XPresetsBrushes on Windows machines, and Library/Application Support/Adobe/Adobe Photoshop X/Presets/Brushes on a Mac, where X is the version of your copy of Photoshop). Click on the small arrow in the Brushes palette or options flyout and choose Load Brushes, then select that .abr file.
Making Your Own Brush
Still can’t find the brush you’re looking for? Photoshop allows you to make your own custom brush. Perhaps you want to make a cool scattering of your logo mark, or maybe you’re just after a specific shape for your brush effect — either way, you can take full control over the shape of your brush by creating it yourself!
The basic idea is simple:
- Create a grayscale image for your brush. The actual size of your image will be the “maximum” size of your brush before things get blurry.
- Select the image and save it as a brush.
- If you want, save the brush into a collection of your other brushes so that you can reload it in the future.
Here’s a specific example to illustrate the steps:
1. Creating the grayscale image
You can create your brush in a variety of ways:
- by creating a vector image in Photoshop (or using another program, such as Illustrator, and importing it into Photoshop as an image)
- by drawing your own image using existing tools in Photoshop
- by utilizing part of a photo or scanned image
Just keep in mind that the solid black areas of your image will result in a solid color, while gray areas will result in transparency.
In this case, I’m going to keep it simple by using one of Photoshop’s built-in vector shapes to create a music note-shaped layer:
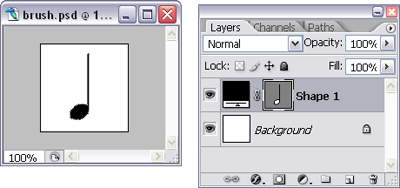
Now, right-click on the shape layer and choose Rasterize Layer.
2. Saving the shape as a brush
Now, make a selection of the document or the area that you want to define as the brush shape. In the figure below, I’ve used the marquee tool to create a rectangle that surrounds the music note.
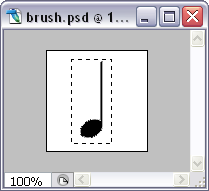
Next go to Edit > Define Brush Preset. A (slightly squashed) preview of your custom brush displays, and you can give your brush a name.
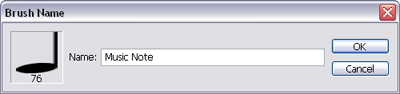
When you view the Brush options, you’ll see that your new brush is listed among the rest:
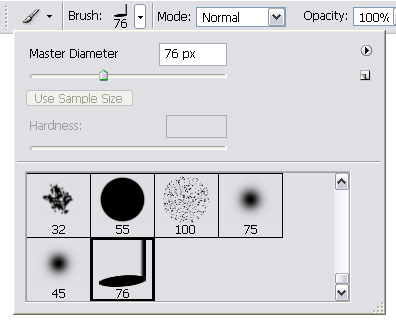
You can now use your brush like any other!
3. Saving your brush set
Your brush will remain in the Brush picker until the next time you load a new set of brushes, at which point you may lose your custom-designed brush.
If you want to save your brush, you can do so by saving the entire set of brushes. Click on the small arrow in the Brush palette or the Brush Preset picker, and choose Save Brushes. This will save an .abr file that you can reload later on. (If you want, you can delete the other brushes in the preset that you don’t want to save, in order to create a set containing only your own custom brushes.)
Once you locate the .abr file to which your brushes have been saved (it will have been saved to the Brushes folder mentioned above), you can copy and share your custom brushes with others.
Summary
Using the Brushes palette to tweak the way Photoshop renders a brushstroke is a powerful technique for creating stunning, unique graphic effects of your own in minutes. Once you’ve mastered the challenge of tweaking the built-in brushes, you can extend this technique to use other brushes. You can even create your own custom-designed brushes, expanding your brush power infinitely. Try out these techniques and master Photoshop brushes today!
Frequently Asked Questions about Photoshop Brushes
How can I create my own Photoshop brushes?
Creating your own Photoshop brushes is a simple process. First, open a new document in Photoshop and draw or import the image you want to turn into a brush. Once you’re satisfied with your design, go to Edit > Define Brush Preset. Give your brush a name and click OK. Your new brush will now be available in the Brush Preset Picker.
Can I modify existing Photoshop brushes?
Yes, you can modify existing Photoshop brushes. To do this, select the brush you want to modify from the Brush Preset Picker. Then, go to Window > Brush Settings. Here, you can adjust the size, shape, and other properties of the brush to suit your needs.
How can I create a full-color brush in Photoshop?
Unfortunately, Photoshop does not support full-color brushes. Brushes in Photoshop are grayscale, meaning they only contain information about the shape and transparency of the brush, not its color. However, you can apply color to a brush stroke by selecting a color before you start painting.
How can I download and install new brushes in Photoshop?
To download and install new brushes in Photoshop, first find a brush set you like online and download it. Most brush sets will come in a .abr file. Once you’ve downloaded the file, open Photoshop and go to Edit > Presets > Preset Manager. Select “Brushes” from the drop-down menu, then click “Load” and navigate to the .abr file you downloaded.
Can I use Photoshop brushes in other Adobe programs?
Yes, you can use Photoshop brushes in other Adobe programs like Illustrator and After Effects. However, the process for importing the brushes may vary depending on the program.
How can I create a brush with texture in Photoshop?
To create a brush with texture in Photoshop, first create or select an image with the texture you want. Then, follow the same steps as creating a regular brush, but in the Brush Settings panel, adjust the Texture settings to apply the texture to your brush.
Can I share my Photoshop brushes with others?
Yes, you can share your Photoshop brushes with others. To do this, go to Edit > Presets > Preset Manager, select the brushes you want to share, and click “Save Set”. This will create a .abr file that you can share with others.
How can I organize my Photoshop brushes?
You can organize your Photoshop brushes using the Preset Manager. Here, you can rename, delete, and reorder your brushes. You can also create sets of brushes to keep them organized.
Can I use Photoshop brushes for commercial projects?
Whether you can use Photoshop brushes for commercial projects depends on the license of the brushes. Some brushes are free for personal and commercial use, while others may require a license or attribution. Always check the license before using brushes in commercial projects.
How can I create a brush from a photo in Photoshop?
To create a brush from a photo in Photoshop, first open the photo and convert it to grayscale by going to Image > Mode > Grayscale. Then, adjust the contrast of the image so that the part you want to turn into a brush is black and the background is white. Finally, go to Edit > Define Brush Preset to create your brush.
 Corrie Haffly
Corrie is the lead designer and developer for PixelMill. This would-be triathlete has a mathematics degree but wishes she had double-majored in computer science and art instead. Maybe next time...