As you may have read in my blog post, RESTful Rails Part I, RESTful Rails is a way of mapping HTTP verbs (GET, POST, PUT, and DELETE) to CRUD actions (Create, Read, Update, and Delete) in your Rails apps. If that sentence was complete gibberish to you, take some time to read the blog post and it may make a bit more sense.
Alright, I assume you’ve had enough to time to absorb my post, and you’re full of CRUD and REST. Now, it’s time to build an actual example.
REST Tumblelog
For this example, we’ll build a (very) basic tumblelog-type app. What’s a Tumblelog? Well it’s like a blog but without the essays. A Tumblelog is a jumble of frequent but short posts that are typically just a link, a quote, a quick comment, and so on.
To start, you’ll need to create a new rails project called rest_tumble, with one model and one controller. So fire up you favourite console and run:
rails rest_tumble
cd rest_tumble
script/generate model post
script/generate controller posts
Open updb/migrate/001_create_posts.rband edit it to look like this:
class CreatePosts
def up
create_table do |t|
t.string :message, :null => false, :limit => 140
t.timestamps
end
end
def self.down
drop_table :posts
end
endThen, run:
rake db:migrate
Finally, add some validation to the post model (app/models/post.rb):
class Post < ActiveRecord::Base
validates_presence_of :message
validates_length_of :message, :maximum => 140
end
Okay, so that now we've created the Rails app, let's configure the controller and the routes. If you cast your mind back to the last article, you would remember that there are four different RESTful verbs. Let's add those four methods to our controller (app/controllers/posts_controller.rb):
class PostsController < ApplicationController
# GET - displays all posts
def index
end
# GET - shows one post (based on the supplied id)
def show
end
# POST - creates a new post
def create
end
# PUT - updates an existing post
def update
end
# DELETE - deletes a post
def destroy
end
end
You can see from the comments above how each REST verb maps to the controller methods. You'll also notice that even though there are four verbs, we need five methods. TheGETverb has two corresponding methods: one shows all the posts, while the other shows a specific post. We actually need two more methods -- new and edit -- to complete the controller.
We add these extra methods for two reasons. First of all, Rails uses the same endpoint (plus maybe an id) for all the verbs, so if we link to/posts(aGETmethod), Rails will return a list of posts. By adding these methods, we have a way to display the forms.
Let's add the extra methods and some code:
class PostsController < ApplicationController
# GET - displays all posts
def index
@posts = Post.find :all, :order => 'created_at ASC'
end
# GET - shows one post (based on the supplied id)
def show
@post = Post.find(params[:id])
end
# GET - displays a form which can be used to create a post
def new
@post = Post.new
end
# POST - create a new post
def create
@post = Post.new(params[:post])
@post.save!
redirect_to post_path(@post)
rescue ActiveRecord::RecordInvalid
render :action => 'new'
end
# GET - displays a form allowing us to edit an existing post
def edit
@post = Post.find(params[:id])
end
# PUT - update an existing post
def update
@post = Post.find(params[:id])
@post.attributes = params[:post]
@post.save!
redirect_to post_path(@post)
rescue ActiveRecord::RecordInvalid
render :action => 'edit'
end
# DELETE - delete a post
def destroy
@post = Post.find(params[:id])
@post.destroy
redirect_to posts_path
end
end
If you've ever done any Rails coding before, there won't be any surprises here, with the possible exception of theposts_path,post_path,edit_post_path, anddelete_post_pathmethods. These special methods will generate a path to a resource based on entries inroutes.rb. If you can't remember the syntax (and it can get a little tricky with things like nested routes), you can run the ever-helpful routes rake task, like so:
rake routes
But for those special methods to work, we need to tell Rails that we have a REST resource. Open upconfig/routes.rband add the following line (about halfway through the code, you should see a similar example line that has been commented out; put this line under it):
map.resources :posts
All this does is tell Rails that we have aposts_controllerthat wants to be RESTful, so it needs to respond accordingly. Try out the routes rake task to see the results of your handiwork.
To complete the site, we need to add the views -- eachGETaction needs a corresponding view:index.html.erb,show.html.erb,new.html.erb, andedit.html.erb. I've also created a_form.html.erbpartial, because the form code for the new and edit methods is basically the same.Here's the
indexview. There's nothing too special about this file -- again, we usepost_path, this time as a parameter of thelink_totag:
# app/views/posts/index.html.erb
<%= link_to 'New message', new_post_path %>
<hr />
<% if @posts.empty? -%>
<p>There are no posts</p>
<% else -%>
<% @posts.each do |post| -%>
<p>
<%= link_to h(post.message), post_path(post) -%>
</p>
<% end -%>
<% end -%>
Here's is theshowview. For this page, we show a delete button and edit link:
# show.html.erb
<p><%= h(@post.message) -%></p>
<% form_tag post_path(@post), :method => :delete do -%>
<%= link_to 'Edit', edit_post_path(@post) -%>
<button type="submit">Delete</button>
<% end -%>
You'll notice in the above code that we have a call to aform_tagincorporating apost_pathand a delete method. This instructs the form to perform aDELETEaction when the button's pressed. However, when the edit link is clicked, we get taken to the special edit view.Both the
newandeditviews are basically the same -- so much so that we use a partial for the common code:
# app/views/posts/new.html.erb
<%= error_messages_for('post') %>
<% form_tag posts_path do -%>
<%= render :partial => 'posts/form' %>
<fieldset>
<button type="submit">Save</button>
<%= link_to 'Cancel', posts_path %>
</fieldset>
<% end -%>
# app/views/posts/edit.html.erb
<%= error_messages_for('post') %>
<% form_tag post_path(@post), :method => :put do -%>
<%= render :partial => 'posts/form' %>
<fieldset>
<button type="submit">Update</button>
<%= link_to 'Cancel', posts_path %>
</fieldset>
<% end -%>
You'll notice that, once again, we set a method attribute, this time withPUT. We don't need to do this for thenewview, as the default action for a form,POST, is right for ournewaction.Finally, let's look at the form partial, which is all very run-of-the-mill as far as Rails forms go:
# app/views/posts/_form.html.erb
<fieldset>
<legend>Enter your message</legend>
<label for="post_message">Message</label>
<%= text_area 'post', 'message' %>
</fieldset>
Let’s run it and see what happens! Run:
ruby script/server
And pointing your browser to http://localhost:3000/posts. With any luck, you should see something similar to this:
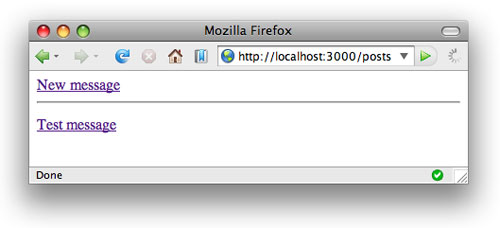
Congratulations! You just created a RESTful Rails app!
XML Goodness
Now, I’ll be the first to admit that this demo isn’t really that impressive — we could have done exactly the same thing using regular CRUD Rails. But where RESTful Rails becomes awesome is when you’re able to publish your own web services for free (well, almost for free — we need to add a couple of lines of code, but that’s it).
To do this, we need to tell Rails that it should respond differently to an XML request. Thankfully, the respond_to method does all the heavy lifting for us. So let’s modify the post’s controller to look like this:
class PostsController < ApplicationController

  # GET - displays all posts

  def index

    @posts = Post.find :all, :order => 'created_at ASC'

    respond_to do |format|

      format.xml { render :xml => @posts.to_xml }

      format.html { }

    end

  end


  # GET - shows one post (based on the supplied id)

  def show

    @post = Post.find(params[:id])

    respond_to do |format|

      format.xml { render :xml => @post.to_xml }

      format.html { }

    end

  end


  # GET - displays a form which can be used to create a post

  def new

    @post = Post.new

  end


  # POST - create a new post

  def create

    @post = Post.new(params[:post])

    @post.save!


    respond_to do |format|

      format.html { redirect_to post_path(@post) }

      format.xml { render :xml => @post.to_xml,

        :status => :created }

    end

    rescue ActiveRecord::RecordInvalid

    respond_to do |format|

      format.html { render :action => 'new' }

      format.xml { render :xml => @post.errors.to_xml,

        :status => 500 }

    end

  end


  # GET - displays a form allowing us to edit an existing post

  def edit

    @post = Post.find(params[:id])

  end


  # PUT - update an existing post

  def update

    @post = Post.find(params[:id])

    @post.attributes = params[:post]

    @post.save!


    respond_to do |format|

      format.html { redirect_to post_path(@post) }

      format.xml { render :xml => @post.to_xml,

        :status => :ok }

    end

    rescue ActiveRecord::RecordInvalid

    respond_to do |format|

      format.html { render :action => 'edit' }

      format.xml { render :xml => @post.errors.to_xml,

        :status => 500 }

    end

  end


  # DELETE - delete a post

  def destroy

    @post  = Post.find(params[:id])

    @post.destroy

    respond_to do |format|

      format.html { redirect_to posts_path }

      format.xml { head :ok }

    end

  end

end
Let’s take a look at what we’ve done here. We’ve introduced the new respond_to block, which allows us to separate the xml and html requests. We’ve also introduced to the app different types of rendering, using the built-in XML type, as well as utilizing to_xml to convert objects to serialized XML for output. Finally, this example shows us how to output different HTTP status codes.
The index and show methods are very simple: if the request is XML, it serializes the object (or objects) and spits them down the line. If you’ve installed curl, you can test this very easily. First, add a couple of posts using the web interface, then type the following in to a terminal:
curl -H 'Accept: application/xml' http://localhost:3000/posts.xml
This command should return a list of posts that you’ve made.
The next features — creating, updating and deleting — are the most interesting. If you tell Rails that the content you’re posting is XML, it will automagically convert (or at least try to convert) the data into an array from which we can create an object.
On completion of a successful Tumblelog post, we send an HTTP status code of 201 Created, accompanied by a copy of the new post object. Sending the new object in the response means the consumer of the web service doesn’t have to make another query to find it, which gives them a handy reference point.
The curl command would look something like this:
curl -H 'Accept: application/xml' -H 'Content-type: application/xml' http://localhost:3000/posts.xml -d '<post><message>A RESTful message</message></post>' -X POST
When we’re successfully updating an existing post, we return a regular status code of 200 OK, again with a copy of the object. For example, if we had an object with an id of 4, we could update it with this code:
curl -H 'Accept: application/xml' -H 'Content-type: application/xml' http://localhost:3000/posts/4.xml -d '<post><message>An updated RESTful message</message></post>' -X PUT
In both the examples above, if the submitted data is not complete, Rails will return the error messages as XML with a status code 500 Internal Server Error.
The final example is a delete, which simply returns a 200 OK response:
curl -H 'Accept: application/xml' -H 'Content-type: application/xml' http://localhost:3000/posts/4.xml -X DELETEExercises For You at Home
You may have noticed that the error handling for the XML version of the site is fairly basic. If you try to update a post that doesn’t exist, you’ll get a HTML error. Try to work out a way to do this with XML — and do the same with other exceptions. Here’s a clue: look at the rescue_from class method.
See if you can work out how to generate a JSON version of the site that would be suitable for responding to AJAX requests. Once you start, you’ll find it easier than you think!
Tying Up Some Loose Ends
- These instructions are run against Rails 2.0.2 using the default SQLite3 database, which is why we don’t need to configure MySQL.
- I’m aware that Rails offers a resource generator that will automatically generate a model, controller, and set of templates for your RESTful app, but you wouldn’t learn anything if I used that, would you?
- As I mentioned in my previous post, no browsers can perform HTTP
PUTorDELETErequests. Rails emulates them by injecting a secret hidden input field, named_method. Try it out and view source on the edit page. You’ll see the form’s method is still a trusty oldPOST, and there’s an extra input field. - I hate the fact that there’s no default delete special method, to allow you to add a deletion confirmation view. I usually add it using the
:memberattribute in the routes file (config/routes.rb), so our previous addition to this file would become:
map.resources :posts, :member => { :delete => :get }
This allows me to add adeleteview (delete.html.erb) as well as letting me replace the delete form and button with a link in theshowview (show.html.erb).Conclusion
That completes the very basic example of a RESTful Rails site. Obviously, there is some other stuff you would need to add for a working web site (authentication for one), but what we have achieved is still pretty impressive. As promised you can download the complete source code for your own use.
 Myles Eftos
Myles a Perth-based web developer who has worked in all the major web languages, his weapon of choice being Ruby on Rails—although he’s found himself doing more and more front-end development in JavaScript, HTML, and CSS.